

Table of Contents
Mum’s deserve the best, and since they can’t go out this year to celebrate, they deserve to have the best Mother’s Day desserts at home!
These desserts can be made in advance and delivered to mum, or if you are a mum, they are fun to make with the kids.
Best Mother’s Day Desserts
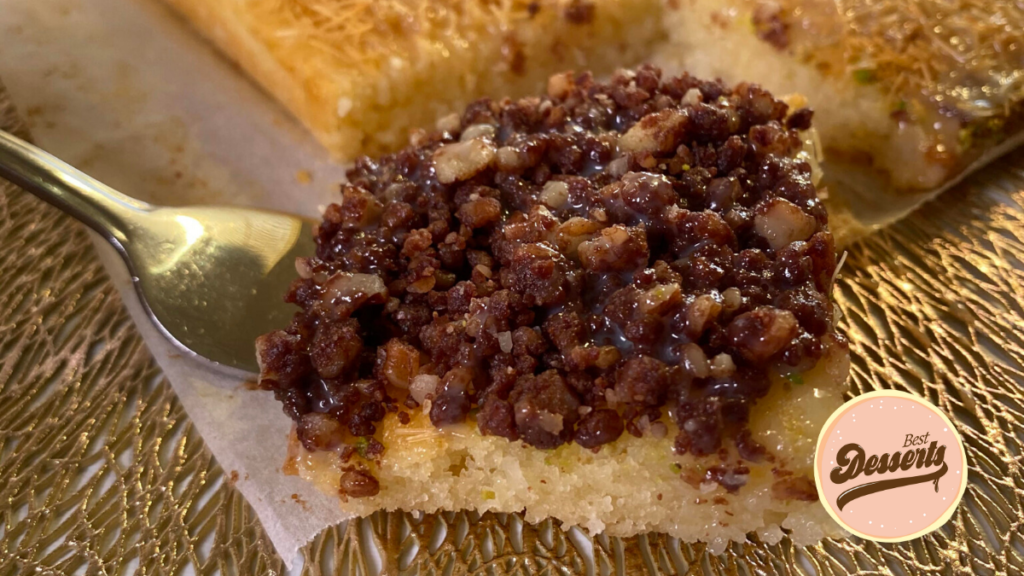
Basbousa (semolina and coconut cake)
By Huda Al Sultan – @huda__alsultan
Basbousa is a Middle Eastern semolina and coconut cake. It’s one of the first desserts I learned how to make with my mum when I was a child, and I loved it so much. My mother also loved to share this cake with friends and sometimes would ask me to make it when she had guests coming over.
In a bowl add all the dry ingredients and mix.
Add in the yoghurt, vanilla and rose & orange blossom water and stir to combine.
Pour in melted butter and stir, cover and let to rest for 20 mins.
Pre-heat oven 160°C
Prepare a baking tray by coating bottom and sides with tahini.
Pour in the batter. Wet hands with water and distribute evenly.
Using a sharp knife, cut into desired shape. Place a blanched almond in the centre of each slice (or as you like to design it).
Bake for 18-20min until slightly risen and golden.
When done and while hot, garnish with crushed pistachio and pecans, then pour room temperature simple sugar syrup or condensed milk over the cake to absorb fully. (Note: If using condensed milk, cover cake for 10 mins after drizzle)
Allow to cool completely before serving.
Ingredients
Directions
In a bowl add all the dry ingredients and mix.
Add in the yoghurt, vanilla and rose & orange blossom water and stir to combine.
Pour in melted butter and stir, cover and let to rest for 20 mins.
Pre-heat oven 160°C
Prepare a baking tray by coating bottom and sides with tahini.
Pour in the batter. Wet hands with water and distribute evenly.
Using a sharp knife, cut into desired shape. Place a blanched almond in the centre of each slice (or as you like to design it).
Bake for 18-20min until slightly risen and golden.
When done and while hot, garnish with crushed pistachio and pecans, then pour room temperature simple sugar syrup or condensed milk over the cake to absorb fully. (Note: If using condensed milk, cover cake for 10 mins after drizzle)
Allow to cool completely before serving.
Notes
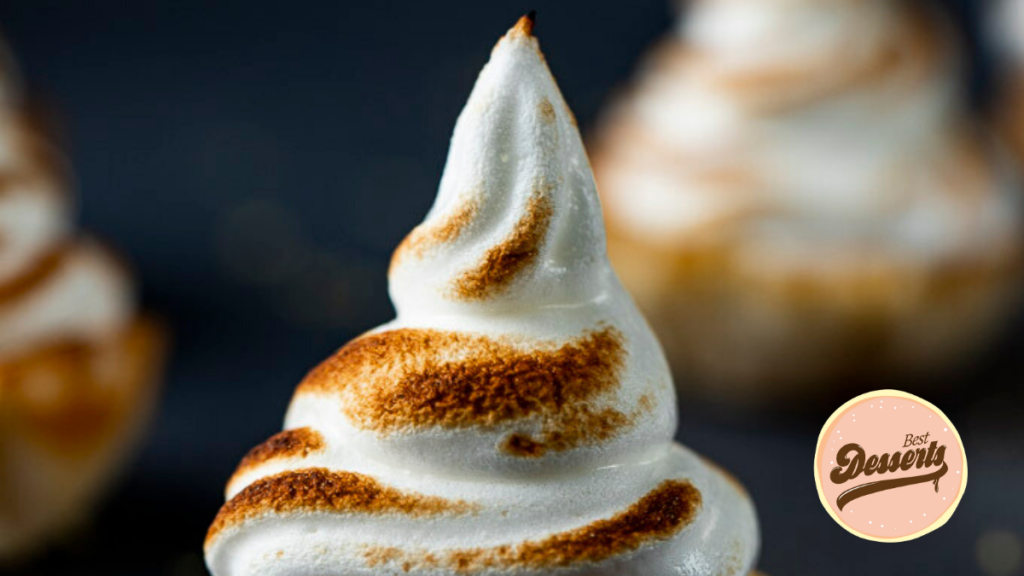
Mini Lemon Meringue Tarts
By Danielle Wolter – Went Here 8 This
When I was young, my mom used to make us lemon meringue pie on a regular basis, and my sister and I just loved it! My favourite part was sneaking fingers of uncooked meringue out of the mixing bowl. It was so good (still is). My mom and I have always been huge fans of citrus desserts and have had many tastes of lemon curd, lime, curd and other sweet citrus recipes. We don’t live close anymore, so don’t see her for Mother’s Day, but these mini Lemon Meringue Tarts are a homage to those days in the kitchen.
Preheat your oven to 350 degrees. Place the tart shells in the oven for 3-5 minutes to crisp up the
edges.
Add the egg whites to a glass bowl and use a mixer to beat until frothy.
Add the cream of tartar. Add the sugar a little at a time while constantly beating the egg whites. Continue to beat until stiff peaks form, about 7-10 minutes.
Fill the pastry shells to the top edge with the lemon curd.
Use a piping bag to top the pastry shells with the meringue.
Use a kitchen torch to toast the outside of the meringue. Don't get the kitchen torch too close or the meringue will burn.
If you don't have a kitchen torch, you can toast the meringue under the broiler, just be sure to watch it closely so it doesn't burn.
The recipe can be easily adjusted to make as many tarts as you need.
You can substitute brown sugar for the granulated sugar.
You can substitute white vinegar or lemon juice for the cream of tartar to help stabilize the egg whites.
Make sure there are no pieces of shell or yolk in your egg whites - this can cause the meringue to not whip up properly.
Separate the whites from the yolks when the eggs are still cold - it is easier this way and they separate cleaner
Let them whites come to room temperature
Use cream of tartar
A clean, dry glass or ceramic bowl will work the best.
Ingredients
Directions
Preheat your oven to 350 degrees. Place the tart shells in the oven for 3-5 minutes to crisp up the
edges.
Add the egg whites to a glass bowl and use a mixer to beat until frothy.
Add the cream of tartar. Add the sugar a little at a time while constantly beating the egg whites. Continue to beat until stiff peaks form, about 7-10 minutes.
Fill the pastry shells to the top edge with the lemon curd.
Use a piping bag to top the pastry shells with the meringue.
Use a kitchen torch to toast the outside of the meringue. Don't get the kitchen torch too close or the meringue will burn.
If you don't have a kitchen torch, you can toast the meringue under the broiler, just be sure to watch it closely so it doesn't burn.
The recipe can be easily adjusted to make as many tarts as you need.
You can substitute brown sugar for the granulated sugar.
You can substitute white vinegar or lemon juice for the cream of tartar to help stabilize the egg whites.
Make sure there are no pieces of shell or yolk in your egg whites - this can cause the meringue to not whip up properly.
Separate the whites from the yolks when the eggs are still cold - it is easier this way and they separate cleaner
Let them whites come to room temperature
Use cream of tartar
A clean, dry glass or ceramic bowl will work the best.
Notes

Coffee Layer Cake
By Elizabeth Waterson – Confessions of a Baking Queen
Growing up a cake that our whole family loved was this Coffee Layer Cake, my Nan started this love affair with this cake and my mum followed the tradition. I have fond memories of standing on a chair in the kitchen so I could reach the counter and help my mum make the cake, and of course, licking the spoon after!
Preheat your oven to 350F/ 180C and grease two 8-inch cake pans, set aside.
In a large bowl whisk together the flour, baking powder, baking soda, and salt.
In another large bowl with a handheld mixer or your stand mixer fitted with the paddle attachment beat the butter for 2 minutes, add the oil, and mix for an additional minute.
Add the sugar and beat for 2-3 minutes, until light and fluffy. Add the eggs.
In a small cup or bowl add the coffee granulates and hot water- stir until coffee granulates have disappeared. Add to the wet ingredients.
Gently fold in half of the flour mixture, then half of the buttermilk then repeat with remaining ingredients. Pour into prepared pan and bake for 20-25 minutes, or until you stick a toothpick in the center and only moist crumbs come out, no wet batter. Let cool on a wire rack for 20 minutes before inverting to cool completely.
Place one cake layer on a cake board or serving plate, spread about 4oz (1/2 Cup) of frosting on the cake, making the edges higher to create a frosting dam for the apricot jam.
Spread jam within that frosting dam and place the remaining cake layer on the top, bottom face up- this helps create a flat top.
Spread frosting on the top layer and decorate with roasted walnuts.
Ingredients
Directions
Preheat your oven to 350F/ 180C and grease two 8-inch cake pans, set aside.
In a large bowl whisk together the flour, baking powder, baking soda, and salt.
In another large bowl with a handheld mixer or your stand mixer fitted with the paddle attachment beat the butter for 2 minutes, add the oil, and mix for an additional minute.
Add the sugar and beat for 2-3 minutes, until light and fluffy. Add the eggs.
In a small cup or bowl add the coffee granulates and hot water- stir until coffee granulates have disappeared. Add to the wet ingredients.
Gently fold in half of the flour mixture, then half of the buttermilk then repeat with remaining ingredients. Pour into prepared pan and bake for 20-25 minutes, or until you stick a toothpick in the center and only moist crumbs come out, no wet batter. Let cool on a wire rack for 20 minutes before inverting to cool completely.
Place one cake layer on a cake board or serving plate, spread about 4oz (1/2 Cup) of frosting on the cake, making the edges higher to create a frosting dam for the apricot jam.
Spread jam within that frosting dam and place the remaining cake layer on the top, bottom face up- this helps create a flat top.
Spread frosting on the top layer and decorate with roasted walnuts.
Notes
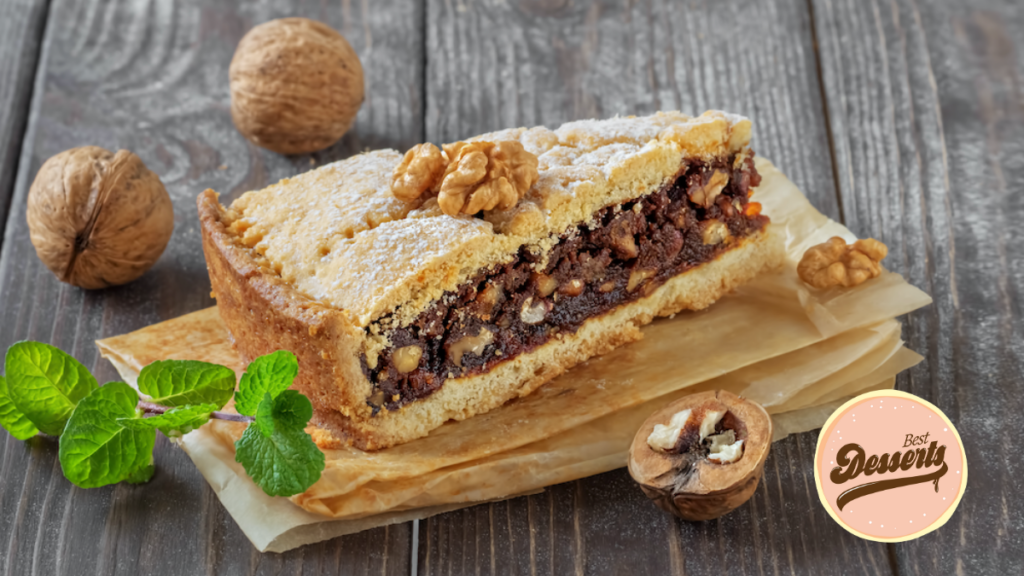
Engadiner Nusstorte – Swiss Caramel Walnut Tart
At Swiss brand Victorinox, family has been the core of our story since 1884, so we understand how important it is to spoil our mums on Mother’s Day. While we may not be able to surprise her with a big adventure this year, we can bring a slice of Switzerland to her – from our home to yours.
Add flour, sugar and a pinch of salt in a bowl. Add lemon rind by using the Victorinox zester and mix together. Slice your cold butter with a Victorinox Butter & Cheese Knife and work it in the mix to form a crumbly dough. Add one egg and knead until a consistent dough is formed. Cover in plastic wrap and refrigerate for 30 minutes.
In a saucepan, bring sugar, honey and a dash of water to a boil whilst stirring. Keep boiling until caramelised to a light brown colour. Heat the cream and add to the caramel whilst stirring swiftly.
Add walnuts to your saucepan and stir well until the mix forms a thickness. Leave to simmer until it reaches a dark golden consistency, keep stirring occasionally. Take off heat and leave to cool.
Take ⅔ of your chilled dough and place in a greased springform. Cover the base and sides (2-3cm high) with dough using a Victorinox Spatula. Pour in the cooled filling and spread evenly.
Roll the remaining dough to form the lid for the dish. Carefully place the circular dough on top of the filling. Join the edges well by pressing the circumference with a Victorinox Cake Fork. Whisk the last egg yolk and brush lightly on top.
Place in the oven at 180 degrees Celsius for 50-60 mins. When the tart is cooked, place in the fridge to completely cool. Once the filling has chilled, dislodge the tart from the tin with help from the Victorinox Spatula.
Serve your Swiss Engadiner Nusstorte to perfection with the Victorinox Pastry Knife. Take a slice to mum in bed, enjoy together with a cup of tea or indulge in a second and third serving.
Ingredients
Directions
Add flour, sugar and a pinch of salt in a bowl. Add lemon rind by using the Victorinox zester and mix together. Slice your cold butter with a Victorinox Butter & Cheese Knife and work it in the mix to form a crumbly dough. Add one egg and knead until a consistent dough is formed. Cover in plastic wrap and refrigerate for 30 minutes.
In a saucepan, bring sugar, honey and a dash of water to a boil whilst stirring. Keep boiling until caramelised to a light brown colour. Heat the cream and add to the caramel whilst stirring swiftly.
Add walnuts to your saucepan and stir well until the mix forms a thickness. Leave to simmer until it reaches a dark golden consistency, keep stirring occasionally. Take off heat and leave to cool.
Take ⅔ of your chilled dough and place in a greased springform. Cover the base and sides (2-3cm high) with dough using a Victorinox Spatula. Pour in the cooled filling and spread evenly.
Roll the remaining dough to form the lid for the dish. Carefully place the circular dough on top of the filling. Join the edges well by pressing the circumference with a Victorinox Cake Fork. Whisk the last egg yolk and brush lightly on top.
Place in the oven at 180 degrees Celsius for 50-60 mins. When the tart is cooked, place in the fridge to completely cool. Once the filling has chilled, dislodge the tart from the tin with help from the Victorinox Spatula.
Serve your Swiss Engadiner Nusstorte to perfection with the Victorinox Pastry Knife. Take a slice to mum in bed, enjoy together with a cup of tea or indulge in a second and third serving.
Notes
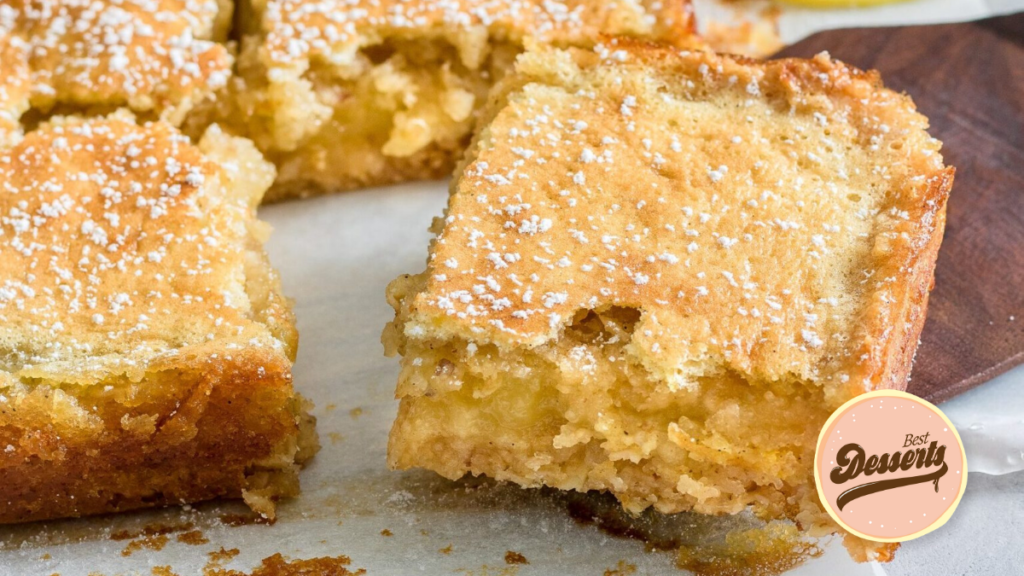
Gooey Lemon Squares
I love Gooey Lemon Squares because not only are they quick and easy to make, but they satisfy those with a sweet tooth, and those who like their desserts a bit more tart. My grandma would make these squares each time we visited her, making these treats a tasty memory as well.
Preheat the oven to 190 degrees C, and grease a 20cm x 30cm x 10cm deep baking pan (or similar).
Combine the base ingredients and pat dough softly into prepared pan.
Bake in the preheated oven for 20-22 minutes, until slightly golden.
While the crust is baking, whisk together the eggs, caster sugar, flour and lemon juice until the mixture becomes frothy.
Pour this lemon mixture over the hot base.
Return pan to the preheated oven for an additional 20 to 25 minutes, or until light 7. golden brown.
Cool on a wire rack.
Dust the top with icing sugar and cut into squares.
Ingredients
Directions
Preheat the oven to 190 degrees C, and grease a 20cm x 30cm x 10cm deep baking pan (or similar).
Combine the base ingredients and pat dough softly into prepared pan.
Bake in the preheated oven for 20-22 minutes, until slightly golden.
While the crust is baking, whisk together the eggs, caster sugar, flour and lemon juice until the mixture becomes frothy.
Pour this lemon mixture over the hot base.
Return pan to the preheated oven for an additional 20 to 25 minutes, or until light 7. golden brown.
Cool on a wire rack.
Dust the top with icing sugar and cut into squares.
Notes
Vegan Ginger Pancakes
A recipe from Naturally Nina and Califia Farms
Combine all ingredients with enough milk to make a thick batter.
Heat a non-stick pan and spoon 2 tbsp on for each pancake. Once firm, flip and cook other side until golden.
Layer with banana and berry slices and top with vegan yoghurt and walnuts.
Tip: Add more of the gingerbread spices to your homemade or store-bought yoghurt for extra festive flavour.
Ingredients
Directions
Combine all ingredients with enough milk to make a thick batter.
Heat a non-stick pan and spoon 2 tbsp on for each pancake. Once firm, flip and cook other side until golden.
Layer with banana and berry slices and top with vegan yoghurt and walnuts.
Tip: Add more of the gingerbread spices to your homemade or store-bought yoghurt for extra festive flavour.
Notes
Nina Gelbke is an Australian clinical Nutritionist (BHSc) specialising in sports nutrition and eating disorders. Follow her Instagram here: @naturally_nina_
For more details on Califia Farms visit: califiafarms.com.au or head to @califiafarms / #califiafarmsau
Jennifer May’s Choc-Tumeric Healthy Hot Chocolate
Whisk all ingredients together in a bowl and then add to a saucepan over low to medium heat. Continue to whisk to allow a gentle foam to develop. Allow to warm to your desired heat. Serve topped with a light dash of cacao/cocoa.
Tip: If you have a sweet tooth then try sprinkling 1/4 of a tsp of sugar over the top of the drink once poured. This way, you drink a small amount of sweet liquid with every mouthful which can make the drink feel more heavily sweetened than it is. This trick also works for children.
For particularly sugar-addicted kids (or adults) as a rule of thumb, start with a sweetened recipe to gain 'trust' in the recipe. Then gradually reduce the sugar each time you make it until you find the lowest level that is tolerated. This often results in enjoying a much lower level of sweetness in just days to weeks.
Ingredients
Directions
Whisk all ingredients together in a bowl and then add to a saucepan over low to medium heat. Continue to whisk to allow a gentle foam to develop. Allow to warm to your desired heat. Serve topped with a light dash of cacao/cocoa.
Tip: If you have a sweet tooth then try sprinkling 1/4 of a tsp of sugar over the top of the drink once poured. This way, you drink a small amount of sweet liquid with every mouthful which can make the drink feel more heavily sweetened than it is. This trick also works for children.
For particularly sugar-addicted kids (or adults) as a rule of thumb, start with a sweetened recipe to gain 'trust' in the recipe. Then gradually reduce the sugar each time you make it until you find the lowest level that is tolerated. This often results in enjoying a much lower level of sweetness in just days to weeks.
Notes
About Jennifer:
Jennifer May is a Nutritionist, author and health speaker based in Sydney CBD. Jennifer is the Director of Food Intolerance Australia and Sydney City Nutritionist where she works both with patients directly and supporting large organisations in their corporate wellbeing initiatives. In her spare time, Jennifer also mentors students and new graduates of Nutrition and Dietetics and volunteers her time for numerous charities. Follow Jennifer on @sydneycitynutritionist and @foodintoleranceaustralia or check out her book Pure Health and Happiness.
For more details on Califia Farms visit: califiafarms.com.au or head to @califiafarms / #califiafarmsau
Leave a Reply