
Table of Contents
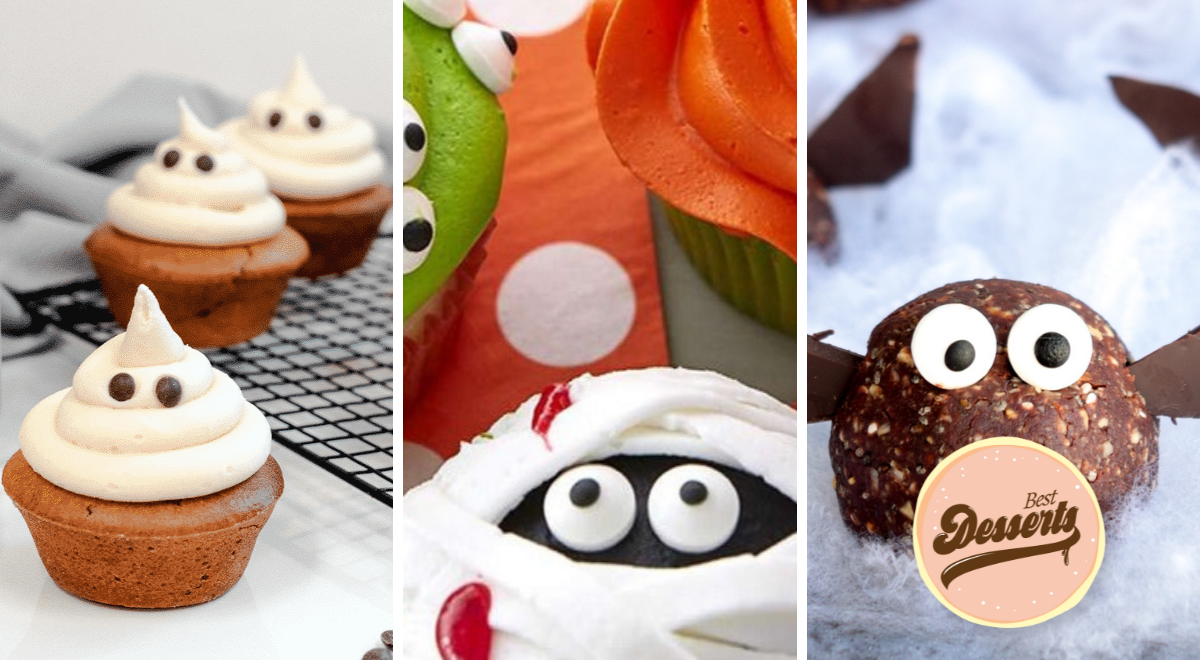
Are you looking for the best Halloween dessert recipes? Then look no further! With things returning to normal in 2022, I think we’re all going to have a great Halloween – I can feel it in my bones!
Halloween candy is yummy, but don’t forget to save room for “I scream”! (And desserts of course).
Now, let’s pumpkin spice things up this Halloween with some of the best Halloween treats.
Best Halloween Dessert Recipes
Olive Spider Pizza with Vodka Sauce

This recipe would suit a variety of pizza styles, but we think our classic pizza dough would be a great fit. Make sure to prepare your dough ahead of time to ensure it rises at room temperature before firing up your oven.
For the vodka sauce, heat the olive oil in a medium saucepan, add the garlic and sauté until fragrant, about one minute. Add the shallots; stir, and cook until translucent, about 5 minutes.
Add the herbs and spices, and cook until the garlic and onions begin to caramelise about 5 more minutes. Pour in the vodka and cook until the alcohol has evaporated, about one more minute. Mix in the tomatoes, bring to a simmer, reduce the heat to low and cook until the sauce has broken down to a smooth and uniform texture, about 20 to 30 minutes.
Remove from heat, add the cream and Parmesan, then purée with an immersion blender or countertop blender until smooth. Season with salt to taste.
Fire up your oven, aiming for 450 to 500°C (850 to 950°F) on the stone baking board inside. (Use an infrared thermometer to quickly and accurately check the temperature of the stone.)
Place a dough ball on your lightly floured work surface. Push the air from the centre out to the edge using your fingers. Stretch the dough out to a 12-inch-round base, then lay the stretched dough over your lightly floured pizza peel or countertop.
Spread 80 grams of vodka sauce in the centre of the pizza.
Sprinkle a quarter of your mozzarella evenly over the sauce.
To create the olive spiders, slice each olive in half lengthwise. Use one half for the spider “body” and cut the other half into 6 strips roughly the same width to create the “legs”.
When topping the pizza, place 3 slices on either side of the olive “spider body”. Repeat until you have covered the pizza with spiders. (Roughly 6 spiders will fit on a 12” pizza.)
Cook for 60 to 90 seconds, rotating every 20 seconds to ensure an even bake.
Remove from the oven when finished and slice, trying to keep your olive spiders intact. Repeat for the remaining three pizzas, and enjoy!
Ingredients
Directions
This recipe would suit a variety of pizza styles, but we think our classic pizza dough would be a great fit. Make sure to prepare your dough ahead of time to ensure it rises at room temperature before firing up your oven.
For the vodka sauce, heat the olive oil in a medium saucepan, add the garlic and sauté until fragrant, about one minute. Add the shallots; stir, and cook until translucent, about 5 minutes.
Add the herbs and spices, and cook until the garlic and onions begin to caramelise about 5 more minutes. Pour in the vodka and cook until the alcohol has evaporated, about one more minute. Mix in the tomatoes, bring to a simmer, reduce the heat to low and cook until the sauce has broken down to a smooth and uniform texture, about 20 to 30 minutes.
Remove from heat, add the cream and Parmesan, then purée with an immersion blender or countertop blender until smooth. Season with salt to taste.
Fire up your oven, aiming for 450 to 500°C (850 to 950°F) on the stone baking board inside. (Use an infrared thermometer to quickly and accurately check the temperature of the stone.)
Place a dough ball on your lightly floured work surface. Push the air from the centre out to the edge using your fingers. Stretch the dough out to a 12-inch-round base, then lay the stretched dough over your lightly floured pizza peel or countertop.
Spread 80 grams of vodka sauce in the centre of the pizza.
Sprinkle a quarter of your mozzarella evenly over the sauce.
To create the olive spiders, slice each olive in half lengthwise. Use one half for the spider “body” and cut the other half into 6 strips roughly the same width to create the “legs”.
When topping the pizza, place 3 slices on either side of the olive “spider body”. Repeat until you have covered the pizza with spiders. (Roughly 6 spiders will fit on a 12” pizza.)
Cook for 60 to 90 seconds, rotating every 20 seconds to ensure an even bake.
Remove from the oven when finished and slice, trying to keep your olive spiders intact. Repeat for the remaining three pizzas, and enjoy!
Notes
Spider Web Soup

Heat oil in a large pot, stir in onion and garlic. Cook for 3-4 minutes until the onion has softened. Add spices and cook for a further minute. Stir in tomato paste.
Add stock, water, lentils, pumpkin and sweet potato. Bring to a boil, reduce heat and simmer for 30 minutes until lentils, pumpkin and sweet potato are tender. With a handheld blender puree until smooth. Season well.
Pour cream into a piping bag (if using). Snip 3mm off the end of the bag. Squeeze a blob of cream into the centre of the bowl and 3-4 rings around the centre blob. With a skewer or a toothpick, drag through the rings of cream from the centre towards the edge of the bowl to create a spider web pattern. Garnish with toasted pepita seeds.
If you do not have a piping bag, the spider web rings can be created by hand with a teaspoon, but it can be a little tricky to get fine lines.
Ingredients
Directions
Heat oil in a large pot, stir in onion and garlic. Cook for 3-4 minutes until the onion has softened. Add spices and cook for a further minute. Stir in tomato paste.
Add stock, water, lentils, pumpkin and sweet potato. Bring to a boil, reduce heat and simmer for 30 minutes until lentils, pumpkin and sweet potato are tender. With a handheld blender puree until smooth. Season well.
Pour cream into a piping bag (if using). Snip 3mm off the end of the bag. Squeeze a blob of cream into the centre of the bowl and 3-4 rings around the centre blob. With a skewer or a toothpick, drag through the rings of cream from the centre towards the edge of the bowl to create a spider web pattern. Garnish with toasted pepita seeds.
If you do not have a piping bag, the spider web rings can be created by hand with a teaspoon, but it can be a little tricky to get fine lines.
Notes
Halloween Hot Dog Mummies
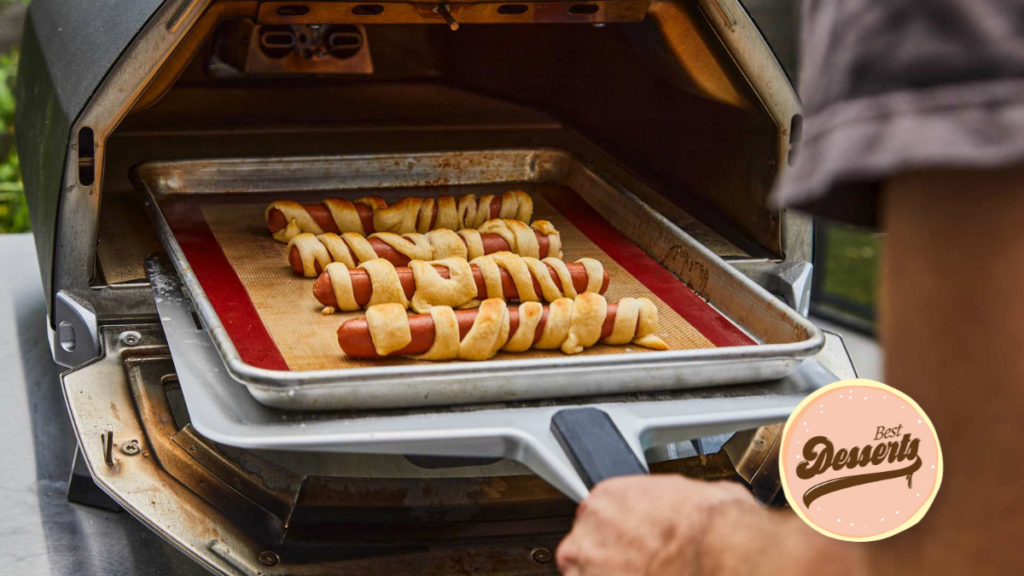
Preheat your oven to 290°C (550°F). Open your puff pastry and cut or tear into 1/2 centimetre thick strips lengthwise.
Wrap strips around hot dogs, mimicking the cloth bandages on a mummy. The more irregular, the better!
Place wrapped hot dogs on a lined baking sheet — we used a nonstick baking mat, but parchment paper also works well — and bake until golden brown, about 5 minutes. Turn once for an even bake.
Remove from the oven using a pizza peel or heat-resistant gloves. Once slightly cool, top with edible googly eyes.
Serve along with your favourite dipping sauces! We love the classics and serve these with ketchup and mustard.
Ingredients
Directions
Preheat your oven to 290°C (550°F). Open your puff pastry and cut or tear into 1/2 centimetre thick strips lengthwise.
Wrap strips around hot dogs, mimicking the cloth bandages on a mummy. The more irregular, the better!
Place wrapped hot dogs on a lined baking sheet — we used a nonstick baking mat, but parchment paper also works well — and bake until golden brown, about 5 minutes. Turn once for an even bake.
Remove from the oven using a pizza peel or heat-resistant gloves. Once slightly cool, top with edible googly eyes.
Serve along with your favourite dipping sauces! We love the classics and serve these with ketchup and mustard.
Notes
Stuffed Halloween Capsicums
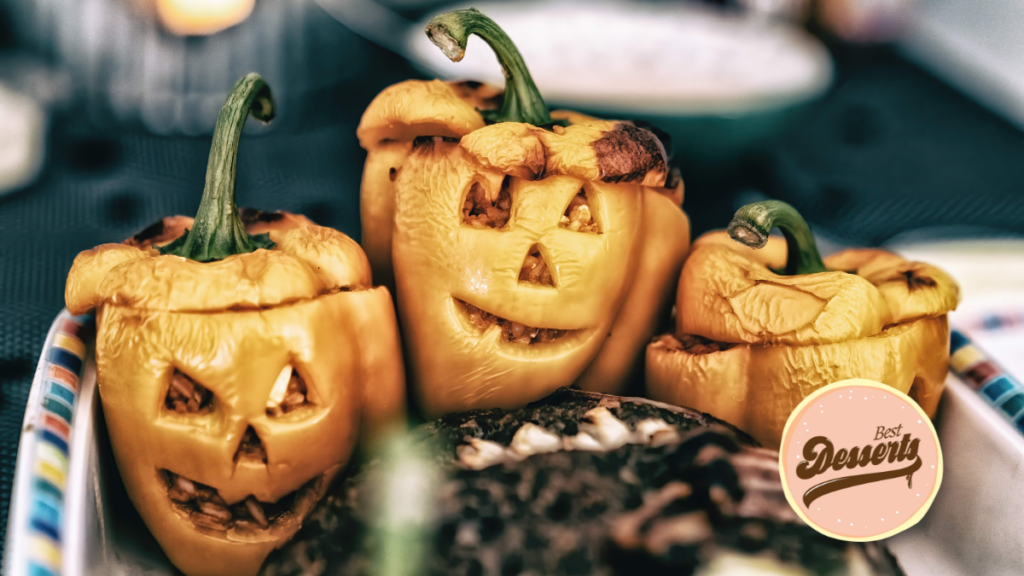
Prepare each capsicum by carving off a lid and a face (eyes, nose and mouth) and removing any seeds and membrane from the centre.
Prepare Pulse Plus mix as per package directions. Rinse and drain then combine in a pot with 4 cups of water. Bring to a boil, reduce heat and simmer for 17 minutes until rice and lentils are just tender. Set aside to cool slightly.
Preheat oven to 180°C (fan forced). Heat oil in a frypan, add onion, bacon, garlic and thyme. Cook for 4-5 minutes until the onion is tender. Stir in tinned tomatoes and paprika and cook for another 5 minutes. Add the Pulse Plus mix, feta and parsley. Gently combine and season well with salt and pepper.
Arrange capsicums in a baking tray and fill them with the rice mixture. Drizzle with a little olive oil, replace the tops of the capsicum and bake for 50 minutes until the capsicums have cooked through.
Ingredients
Directions
Prepare each capsicum by carving off a lid and a face (eyes, nose and mouth) and removing any seeds and membrane from the centre.
Prepare Pulse Plus mix as per package directions. Rinse and drain then combine in a pot with 4 cups of water. Bring to a boil, reduce heat and simmer for 17 minutes until rice and lentils are just tender. Set aside to cool slightly.
Preheat oven to 180°C (fan forced). Heat oil in a frypan, add onion, bacon, garlic and thyme. Cook for 4-5 minutes until the onion is tender. Stir in tinned tomatoes and paprika and cook for another 5 minutes. Add the Pulse Plus mix, feta and parsley. Gently combine and season well with salt and pepper.
Arrange capsicums in a baking tray and fill them with the rice mixture. Drizzle with a little olive oil, replace the tops of the capsicum and bake for 50 minutes until the capsicums have cooked through.
Notes
Spider Web Chocolate Cake
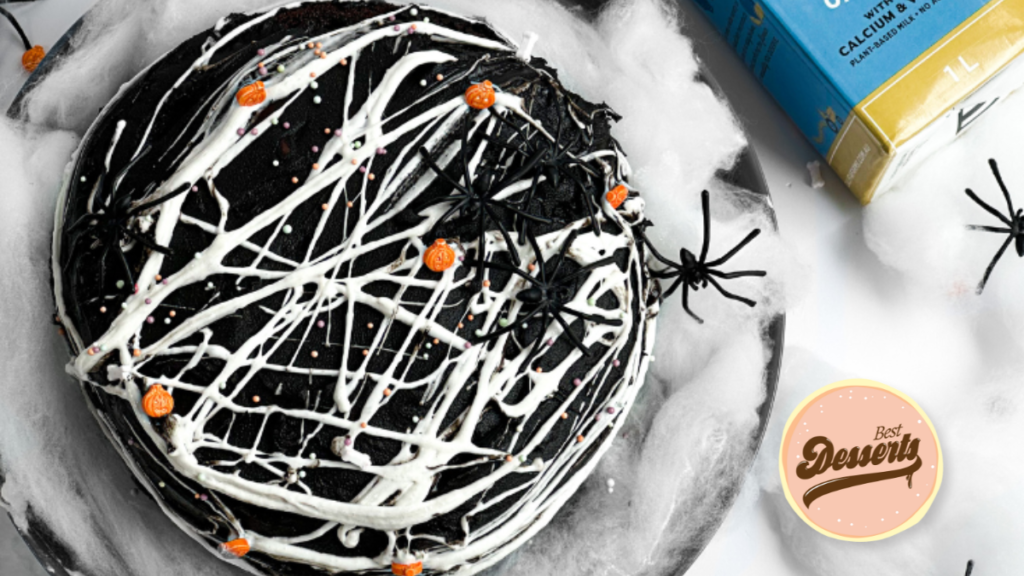
Preheat the oven to 180C. Grease 2 x 20cm cake tins. To a bowl, add flour, cocoa powder, baking soda, salt, and sugar. Stir briefly.
In a second bowl, add oat milk, oil and vanilla. Add wet mixture to dry ingredients. Stir to
combine. Divide the mixture, and pour it into prepared cake tins. Bake for 25-30 minutes or until cooked through. Allow cooling.
Meanwhile, place coconut and chocolate into a small saucepan. Melt until smooth. Allow cooling. Add red food dye to your colour liking. Place into the fridge to set.
For the frosting, add the butter to a stand mixer. Slowly add the powdered sugar until well
combined. Add vanilla, oat milk and black food colouring to your colour liking.
Melt marshmallows in the microwave for 30 seconds. It’s now time to assemble! Add the edible bloody mixture between the two mud cake layers. Spread over black frosting evenly. Using two forks, stretch the sticky marshmallows to create ‘spider-like’ webs. Layer over the frosting. Add your favourite Halloween sprinkles. Allow cake to firm up in the fridge for approximately 1 hour.
Ingredients
Directions
Preheat the oven to 180C. Grease 2 x 20cm cake tins. To a bowl, add flour, cocoa powder, baking soda, salt, and sugar. Stir briefly.
In a second bowl, add oat milk, oil and vanilla. Add wet mixture to dry ingredients. Stir to
combine. Divide the mixture, and pour it into prepared cake tins. Bake for 25-30 minutes or until cooked through. Allow cooling.
Meanwhile, place coconut and chocolate into a small saucepan. Melt until smooth. Allow cooling. Add red food dye to your colour liking. Place into the fridge to set.
For the frosting, add the butter to a stand mixer. Slowly add the powdered sugar until well
combined. Add vanilla, oat milk and black food colouring to your colour liking.
Melt marshmallows in the microwave for 30 seconds. It’s now time to assemble! Add the edible bloody mixture between the two mud cake layers. Spread over black frosting evenly. Using two forks, stretch the sticky marshmallows to create ‘spider-like’ webs. Layer over the frosting. Add your favourite Halloween sprinkles. Allow cake to firm up in the fridge for approximately 1 hour.
Notes
Custard Brownie Monsters
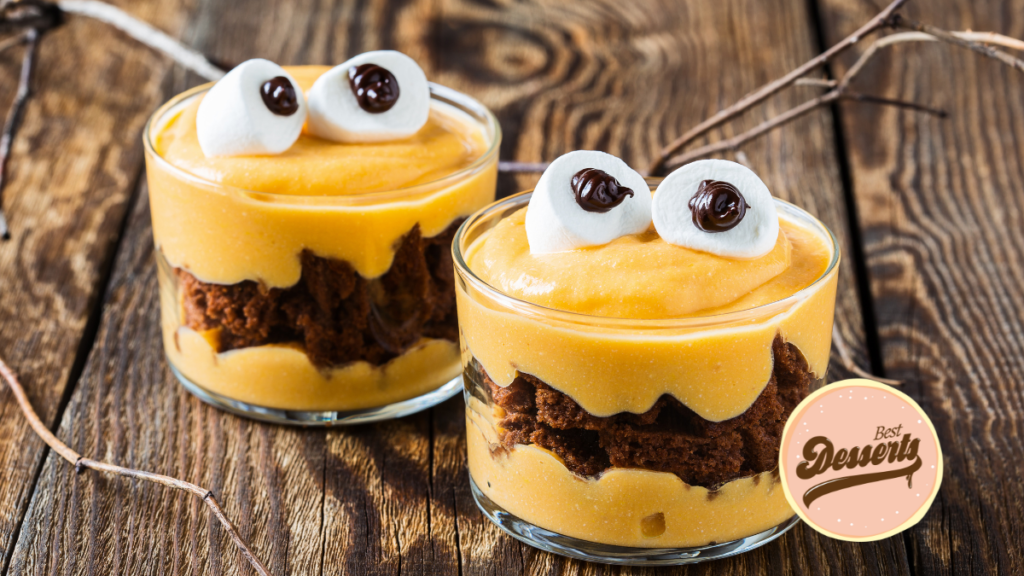
Preheat oven to 170°C. Grease a 20x20cm square pan with butter and line it with baking paper.
Combine butter and dark chocolate in a microwave-safe bowl. Microwave for 45 – 60 seconds. Whisk together until smooth and set aside to cool.
In another bowl, beat together eggs and sugar for 2-3 minutes until creamy. Add the chocolate mixture and vanilla extract and whisk again.
In another bowl, sift together cocoa powder, salt, chickpea flour and coffee powder, then fold into the wet mixture. Add chocolate chips and stir gently. 5. Pour the brownie mixture into the greased and lined tin and bake for 35-40 minutes. Allow to cool completely before cutting the brownie mixture into small chunks. Set aside while making the custard.
In a saucepan, whisk together eggs, corn flour, sugar, vanilla essence and milk until smooth. Continue whisking on the stovetop until the custard becomes thick and creamy. Remove from heat and allow to cool slightly before assembling the monster pots.
In medium size glasses, place 3 tablespoons of custard, then add a layer of brownie. Add another 3 tablespoons of custard for the top layer. Decorate pots with marshmallows and choc chips to make the monster eyes.
To save time, use store-bought custard powder or ready-made custard from the chilled section of the supermarket.
Ingredients
Directions
Preheat oven to 170°C. Grease a 20x20cm square pan with butter and line it with baking paper.
Combine butter and dark chocolate in a microwave-safe bowl. Microwave for 45 – 60 seconds. Whisk together until smooth and set aside to cool.
In another bowl, beat together eggs and sugar for 2-3 minutes until creamy. Add the chocolate mixture and vanilla extract and whisk again.
In another bowl, sift together cocoa powder, salt, chickpea flour and coffee powder, then fold into the wet mixture. Add chocolate chips and stir gently. 5. Pour the brownie mixture into the greased and lined tin and bake for 35-40 minutes. Allow to cool completely before cutting the brownie mixture into small chunks. Set aside while making the custard.
In a saucepan, whisk together eggs, corn flour, sugar, vanilla essence and milk until smooth. Continue whisking on the stovetop until the custard becomes thick and creamy. Remove from heat and allow to cool slightly before assembling the monster pots.
In medium size glasses, place 3 tablespoons of custard, then add a layer of brownie. Add another 3 tablespoons of custard for the top layer. Decorate pots with marshmallows and choc chips to make the monster eyes.
To save time, use store-bought custard powder or ready-made custard from the chilled section of the supermarket.
Notes
Chocolate Mummy Cookies
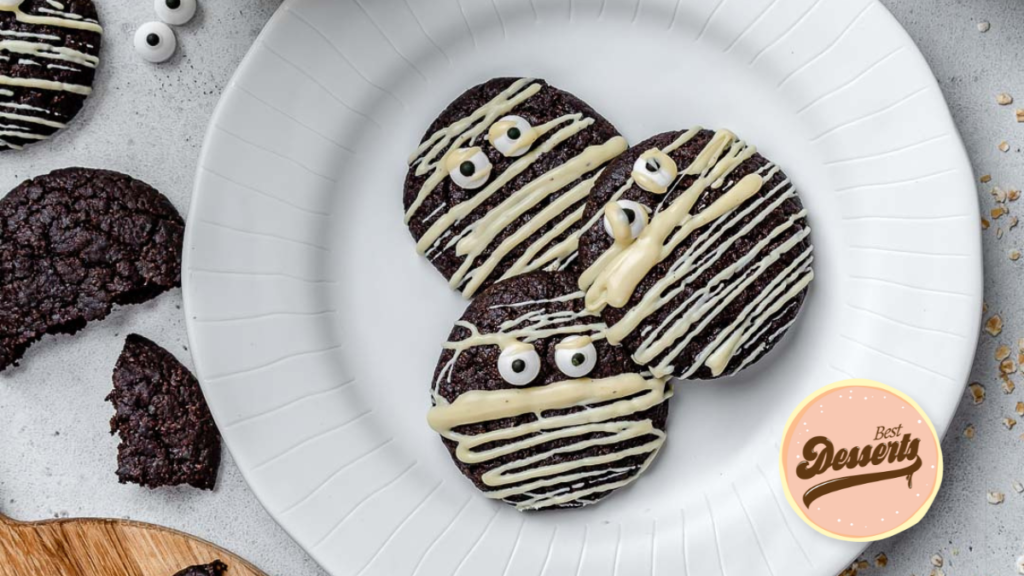
Preheat the oven to 325°F (160°C) and line one large baking tray with a Silpat mat or parchment paper.
Combine all dry ingredients in a mixing bowl.
Using a hand mixer, combine all the wet ingredients in a separate bowl.
Mix the ingredients until a sticky dough develops by pouring the wet ingredients over the dry ones.
Make a large ball out of the dough using a silicone spatula.
Take a small amount of dough, form it into a ball between your palms, and set it on the baking sheet that has been lined with parchment paper. Repeat the process with the leftover dough, (you should get about 8-10 balls). Create a gap between each ball as you arrange the balls on the tray.
After transferring, bake for 12 to 15 minutes in the preheated oven. After cooling, they will become crisp on the outside and chewy on the inside. When they first come out of the oven, they will appear a little squishy. So, give the cookies about 10 minutes to cool before removing them from the baking sheet.
Add 2 candy eyes to each cookie, then drizzle with white chocolate. Refrigerate for a few minutes to set.
Use pure melted butter and brown sugar to create chewy, soft chocolate cookies. These will result in an easily workable dough, which is necessary for that purpose.
Plain all-purpose flour or self-raising flour can be used in place of oat flour. If you choose plain flour, you must add a rising agent of some kind.
You can use white, dark, or milk chocolate to decorate these homemade Halloween cookies, or you can choose to make them plain.
Ingredients
Directions
Preheat the oven to 325°F (160°C) and line one large baking tray with a Silpat mat or parchment paper.
Combine all dry ingredients in a mixing bowl.
Using a hand mixer, combine all the wet ingredients in a separate bowl.
Mix the ingredients until a sticky dough develops by pouring the wet ingredients over the dry ones.
Make a large ball out of the dough using a silicone spatula.
Take a small amount of dough, form it into a ball between your palms, and set it on the baking sheet that has been lined with parchment paper. Repeat the process with the leftover dough, (you should get about 8-10 balls). Create a gap between each ball as you arrange the balls on the tray.
After transferring, bake for 12 to 15 minutes in the preheated oven. After cooling, they will become crisp on the outside and chewy on the inside. When they first come out of the oven, they will appear a little squishy. So, give the cookies about 10 minutes to cool before removing them from the baking sheet.
Add 2 candy eyes to each cookie, then drizzle with white chocolate. Refrigerate for a few minutes to set.
Use pure melted butter and brown sugar to create chewy, soft chocolate cookies. These will result in an easily workable dough, which is necessary for that purpose.
Plain all-purpose flour or self-raising flour can be used in place of oat flour. If you choose plain flour, you must add a rising agent of some kind.
You can use white, dark, or milk chocolate to decorate these homemade Halloween cookies, or you can choose to make them plain.
Notes
Almond Witch Finger Biscuits
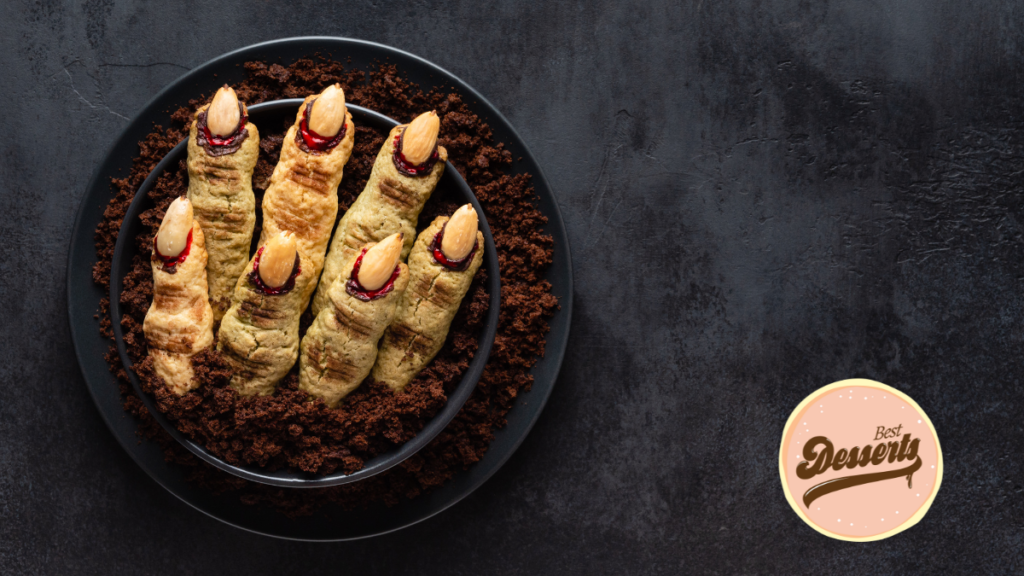
Place the egg whites into a clean mixer bowl, add sugar, and mix on high speed, beating until the egg whites are stiff and fluffy. Add honey and mix again for another minute, then gently stir in essence.
In another bowl combine the almond flour, plain flour, and baking powder, whisking to combine thoroughly.
Gently fold these dry ingredients into the egg white mixture, folding carefully not to deflate the egg whites. Let this rest for 30 minutes.
In the meantime, preheat the oven to 150°C (fan-forced) and line two trays with baking paper.
Roll approximately 2 tablespoons of mixture into the shape of a finger. Gently push an almond into the tip like a fingernail. To make them more witch-like, roll the mixture slightly crooked.
With the tip of a knife, score the top of each finger to resemble the creases of the knuckle.
Bake for 10-12 minutes, and allow to cool for 5 minutes on the tray before transferring to a rack to cool completely.
Ingredients
Directions
Place the egg whites into a clean mixer bowl, add sugar, and mix on high speed, beating until the egg whites are stiff and fluffy. Add honey and mix again for another minute, then gently stir in essence.
In another bowl combine the almond flour, plain flour, and baking powder, whisking to combine thoroughly.
Gently fold these dry ingredients into the egg white mixture, folding carefully not to deflate the egg whites. Let this rest for 30 minutes.
In the meantime, preheat the oven to 150°C (fan-forced) and line two trays with baking paper.
Roll approximately 2 tablespoons of mixture into the shape of a finger. Gently push an almond into the tip like a fingernail. To make them more witch-like, roll the mixture slightly crooked.
With the tip of a knife, score the top of each finger to resemble the creases of the knuckle.
Bake for 10-12 minutes, and allow to cool for 5 minutes on the tray before transferring to a rack to cool completely.
Notes
Pumpkin Spiced Whoopie Pie Monsters
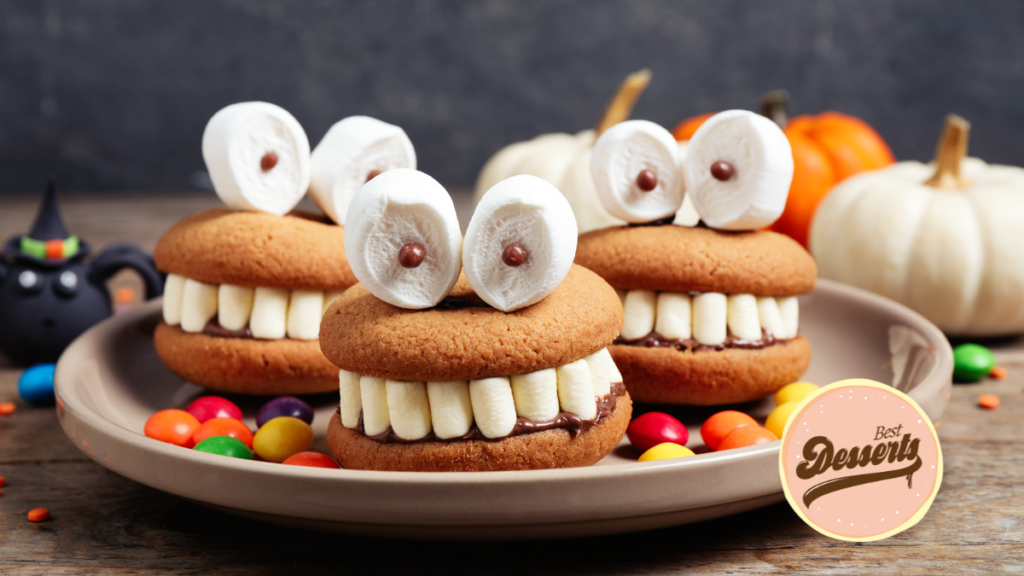
Preheat oven to 160°C (fan forced) and line 2 baking trays with baking paper.
In a large bowl, sift together plain flour, baking powder and bi-carb soda. Then whisk in the almond flour until well combined.
In a small bowl, combine pumpkin spice ingredients. Add the spices to the flour mixture and whisk together.
In the bowl of an electric mixer, add the butter, sugar, treacle or golden syrup and beat until light and fluffy. Add eggs and beat together on medium speed for 2 minutes.
Add the flour mixture and beat on low until combined.
Place batter into a piping bag and snip 1cm off the end. Squeeze approximately 1 tablespoon of batter onto the tray, leaving 5cm between each whoopie to allow for spreading.
Bake one tray at a time for 13-15 minutes until golden in colour and just firm to the
touch. Allow cooling on the tray for 5-10 minutes then transfer to a wire rack to cool
completely.
In an electric mixer bowl, beat the butter until light and fluffy for approximately 5 minutes. Gradually beat in the icing sugar, half a cup at a time, until well combined. Beat in cocoa powder and chocolate spread until smooth and creamy.
Spoon the chocolate filling onto half of the whoopie pies and sandwich the remaining
halves together. Add a row of mini marshmallows for the teeth. Use the larger marshmallows that have been cut into half for the eyes. Place a small blob of filling
behind the eyes to secure them to the top of the whoopie pie. Add a choc chip for the
pupil of the eyes.
Ingredients
Directions
Preheat oven to 160°C (fan forced) and line 2 baking trays with baking paper.
In a large bowl, sift together plain flour, baking powder and bi-carb soda. Then whisk in the almond flour until well combined.
In a small bowl, combine pumpkin spice ingredients. Add the spices to the flour mixture and whisk together.
In the bowl of an electric mixer, add the butter, sugar, treacle or golden syrup and beat until light and fluffy. Add eggs and beat together on medium speed for 2 minutes.
Add the flour mixture and beat on low until combined.
Place batter into a piping bag and snip 1cm off the end. Squeeze approximately 1 tablespoon of batter onto the tray, leaving 5cm between each whoopie to allow for spreading.
Bake one tray at a time for 13-15 minutes until golden in colour and just firm to the
touch. Allow cooling on the tray for 5-10 minutes then transfer to a wire rack to cool
completely.
In an electric mixer bowl, beat the butter until light and fluffy for approximately 5 minutes. Gradually beat in the icing sugar, half a cup at a time, until well combined. Beat in cocoa powder and chocolate spread until smooth and creamy.
Spoon the chocolate filling onto half of the whoopie pies and sandwich the remaining
halves together. Add a row of mini marshmallows for the teeth. Use the larger marshmallows that have been cut into half for the eyes. Place a small blob of filling
behind the eyes to secure them to the top of the whoopie pie. Add a choc chip for the
pupil of the eyes.
Notes
Spooky Sesame Tortilla Chips with Pumpkin Hummus

Preheat oven to 190°C. Line a baking trap with baking paper.
Use a bat-shaped cookie cutter to cut bat shapes from tortillas. Place bats onto the prepared tray.
Lightly brush bats with egg white and sprinkle generously with sesame seeds.
Bake for 12-15 minutes, until lightly browned. Transfer to a wire rack to cool.
Meanwhile, to make hummus, process all ingredients in a large food processor until combined. Season with salt and pepper.
Transfer to a small bowl and serve with tortilla chips.
Bat-shaped cookie cutters are readily available during the Halloween season. Find them at major supermarkets or your nearest department store. Add water to pumpkin hummus, if needed, to get a smoother consistency.
Serve with your favorite non-starchy veggies for dipping.
Ingredients
Directions
Preheat oven to 190°C. Line a baking trap with baking paper.
Use a bat-shaped cookie cutter to cut bat shapes from tortillas. Place bats onto the prepared tray.
Lightly brush bats with egg white and sprinkle generously with sesame seeds.
Bake for 12-15 minutes, until lightly browned. Transfer to a wire rack to cool.
Meanwhile, to make hummus, process all ingredients in a large food processor until combined. Season with salt and pepper.
Transfer to a small bowl and serve with tortilla chips.
Bat-shaped cookie cutters are readily available during the Halloween season. Find them at major supermarkets or your nearest department store. Add water to pumpkin hummus, if needed, to get a smoother consistency.
Serve with your favorite non-starchy veggies for dipping.
Notes
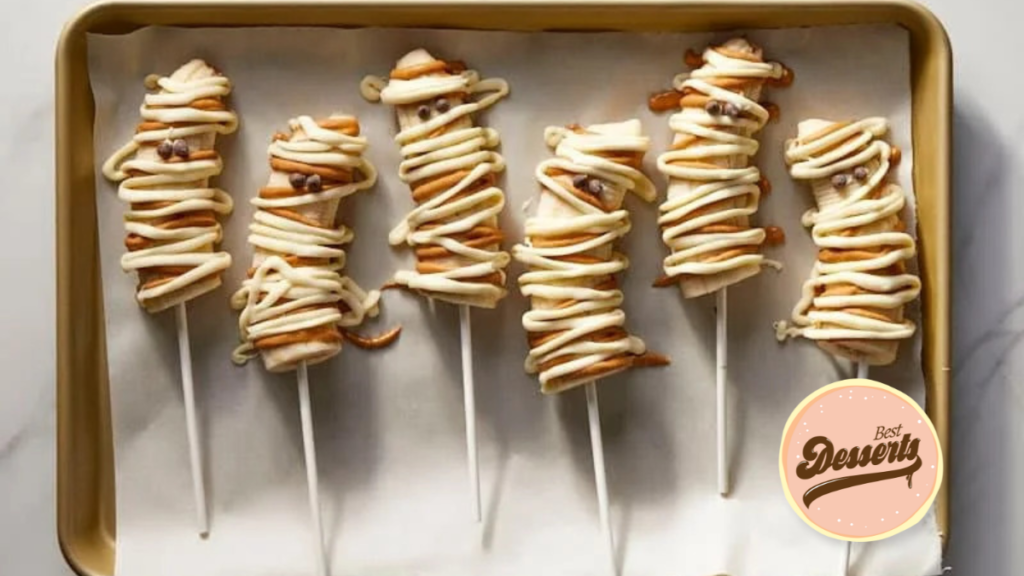
White Chocolate and Peanut Butter Banana Mummy Pops
Line a baking tray with baking paper.
Insert a popsicle stick or skewer into the cut side of each banana half and place it onto the prepared tray. Freeze for 30 minutes or until firm.
Meanwhile, mix peanut butter powder with cinnamon and 2 tablespoons of water in a small bowl until smooth and combined.
Spoon the mixture into a reusable piping bag with a nozzle and set aside.
Microwave white chocolate in a small microwave-safe bowl on High (100%) in 15-second increments, stirring each time until completely melted.
Spoon melted white chocolate into a second piping bag with a nozzle.
Remove bananas from the freezer and drizzle with melted white chocolate and peanut butter mixture, leaving a small space to place the eyes.
To make the eyes, pipe a dot of melted white chocolate onto each milk chocolate chip.
Place onto the reserved space on the banana.
Place mummies in the fridge for 30 minutes or until set. Serve.
If you don’t have a reusable piping bag, you can purchase disposable plastic piping bags from major supermarkets. Just be sure to rinse and recycle it at your local major grocery store. You can find soft plastic recycling bins by the checkouts. Be careful not to overheat the white chocolate, as it will go hard.
Ingredients
Directions
Line a baking tray with baking paper.
Insert a popsicle stick or skewer into the cut side of each banana half and place it onto the prepared tray. Freeze for 30 minutes or until firm.
Meanwhile, mix peanut butter powder with cinnamon and 2 tablespoons of water in a small bowl until smooth and combined.
Spoon the mixture into a reusable piping bag with a nozzle and set aside.
Microwave white chocolate in a small microwave-safe bowl on High (100%) in 15-second increments, stirring each time until completely melted.
Spoon melted white chocolate into a second piping bag with a nozzle.
Remove bananas from the freezer and drizzle with melted white chocolate and peanut butter mixture, leaving a small space to place the eyes.
To make the eyes, pipe a dot of melted white chocolate onto each milk chocolate chip.
Place onto the reserved space on the banana.
Place mummies in the fridge for 30 minutes or until set. Serve.
If you don’t have a reusable piping bag, you can purchase disposable plastic piping bags from major supermarkets. Just be sure to rinse and recycle it at your local major grocery store. You can find soft plastic recycling bins by the checkouts. Be careful not to overheat the white chocolate, as it will go hard.
Notes
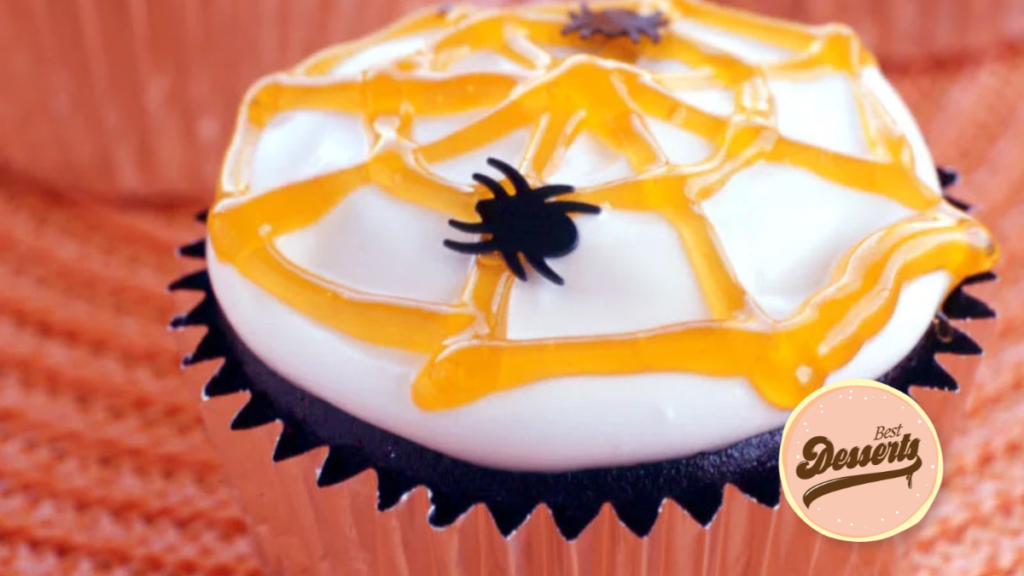
Chocolate Halloween Cupcakes
Preheat the oven to 180°C. Line two 12-hole muffin trays with paper cases. Set aside.
Sift flour and cocoa into a large bowl. Stir in stevia.
Whisk buttermilk and egg and spread in a medium bowl until combined.
Add to flour mixture and stir until combined (do not overmix).
Spoon mixture into muffin trays and bake for 20 minutes or until a skewer inserted in the center comes out clean. Allow cooling completely.
Place the sugar, 1/2 cup water, egg whites, 1/2 tsp salt, and vanilla in a medium bowl.
Beat using electric beaters for 1 minute.
Place the bowl over a saucepan of boiling water and continue to beat for 5-7 minutes or until the mixture thickens and forms soft peaks.
Remove the frosting from the heat and continue to beat for 5 minutes or until the mixture is stiff enough to spread.
Frost the cooled cupcakes with this frosting.
Whisk the icing sugar mixture with orange food coloring until combined. Using the orange icing, make a web pattern.
Top with a plastic spider just for fun. Serve.
Ingredients
Directions
Preheat the oven to 180°C. Line two 12-hole muffin trays with paper cases. Set aside.
Sift flour and cocoa into a large bowl. Stir in stevia.
Whisk buttermilk and egg and spread in a medium bowl until combined.
Add to flour mixture and stir until combined (do not overmix).
Spoon mixture into muffin trays and bake for 20 minutes or until a skewer inserted in the center comes out clean. Allow cooling completely.
Place the sugar, 1/2 cup water, egg whites, 1/2 tsp salt, and vanilla in a medium bowl.
Beat using electric beaters for 1 minute.
Place the bowl over a saucepan of boiling water and continue to beat for 5-7 minutes or until the mixture thickens and forms soft peaks.
Remove the frosting from the heat and continue to beat for 5 minutes or until the mixture is stiff enough to spread.
Frost the cooled cupcakes with this frosting.
Whisk the icing sugar mixture with orange food coloring until combined. Using the orange icing, make a web pattern.
Top with a plastic spider just for fun. Serve.
Notes
Peanut Butter Spider Cookies

Position oven racks in the top and bottom thirds of the oven and preheat to 375 degrees F. Line 2 baking sheets with parchment paper.
Sort the chocolate candies into bigger and smaller balls. The smaller balls will serve as the spider heads, while the larger balls will serve as the body.
In a small bowl, combine the salt, baking soda, and flour. In a medium bowl, use an electric mixer on medium-high speed to cream the butter and sugar until light and fluffy, about 3 to 4 minutes. After adding the vanilla and egg, mix everything for about a minute. Add the peanut butter and blend for approximately a minute, or until smooth. Turn the mixer speed down to low and add half of the flour mixture. Beat on medium until combined, then reduce the speed to low and gradually incorporate the remaining flour mixture. Beat at medium speed until combined.
Hand-roll the dough into 1-inch balls, lay them about an inch apart on the baking sheets, and bake for 16 minutes, rotating the baking sheets halfway through, or until the cookies are a light golden brown and have widened to about 2 inches. The tops of the cookies should feel dry and somewhat firm when touched with fingers, and they should have a strong peanut butter aroma.
Meanwhile, melt the chocolate in a double boiler. Take the mixture off the fire and quickly allow it to cool so that it is slightly thicker but still pipeable.
After the cookies have finished baking, take them out of the oven and place them on a cooling rack. Push 2 chocolate candies into each heated cookie at once, one in the center and the other directly behind it. Place the smaller chocolate ball toward the edge of the cookie.
When the melted chocolate has thickened slightly, put the melted chocolate into a plastic bag and snip a tiny hole in the corner to make a piping bag. Starting from the spot where the two chocolate candies meet, pipe 8 legs onto each cookie. The four legs at the front are piped upward toward the head, while the four legs at the back are piped backward past the torso. Reserve the remaining chocolate in the piping bag for the pupils of the eyes.
Use the cake decorating gel to pipe two 1/4-inch circles for eyes on the "heads" of each spider. To create the pupils, put a little dot of the reserved melted chocolate in the center of each.
When measuring flour, we spoon it into a dry measuring cup and level off the excess. (Scooping directly from the bag compacts the flour, resulting in dry baked goods.)
Ingredients
Directions
Position oven racks in the top and bottom thirds of the oven and preheat to 375 degrees F. Line 2 baking sheets with parchment paper.
Sort the chocolate candies into bigger and smaller balls. The smaller balls will serve as the spider heads, while the larger balls will serve as the body.
In a small bowl, combine the salt, baking soda, and flour. In a medium bowl, use an electric mixer on medium-high speed to cream the butter and sugar until light and fluffy, about 3 to 4 minutes. After adding the vanilla and egg, mix everything for about a minute. Add the peanut butter and blend for approximately a minute, or until smooth. Turn the mixer speed down to low and add half of the flour mixture. Beat on medium until combined, then reduce the speed to low and gradually incorporate the remaining flour mixture. Beat at medium speed until combined.
Hand-roll the dough into 1-inch balls, lay them about an inch apart on the baking sheets, and bake for 16 minutes, rotating the baking sheets halfway through, or until the cookies are a light golden brown and have widened to about 2 inches. The tops of the cookies should feel dry and somewhat firm when touched with fingers, and they should have a strong peanut butter aroma.
Meanwhile, melt the chocolate in a double boiler. Take the mixture off the fire and quickly allow it to cool so that it is slightly thicker but still pipeable.
After the cookies have finished baking, take them out of the oven and place them on a cooling rack. Push 2 chocolate candies into each heated cookie at once, one in the center and the other directly behind it. Place the smaller chocolate ball toward the edge of the cookie.
When the melted chocolate has thickened slightly, put the melted chocolate into a plastic bag and snip a tiny hole in the corner to make a piping bag. Starting from the spot where the two chocolate candies meet, pipe 8 legs onto each cookie. The four legs at the front are piped upward toward the head, while the four legs at the back are piped backward past the torso. Reserve the remaining chocolate in the piping bag for the pupils of the eyes.
Use the cake decorating gel to pipe two 1/4-inch circles for eyes on the "heads" of each spider. To create the pupils, put a little dot of the reserved melted chocolate in the center of each.
When measuring flour, we spoon it into a dry measuring cup and level off the excess. (Scooping directly from the bag compacts the flour, resulting in dry baked goods.)
Notes
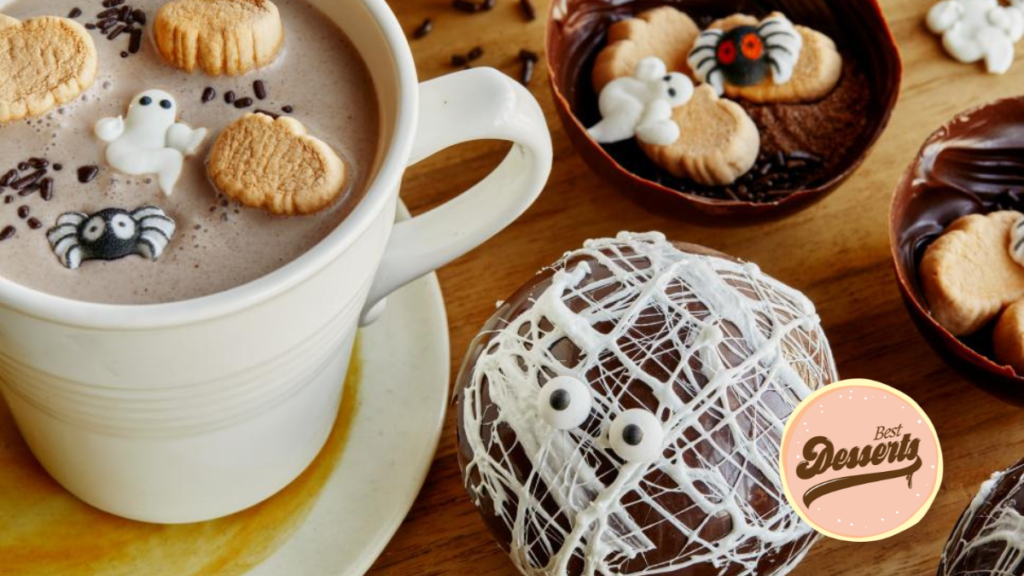
Halloween Hot Cocoa Bombs
Put 8 ounces of chocolate in a double boiler over low heat to temper it. Heat the chocolate while stirring until it almost melts (about 100 degrees F on an instant-read thermometer). Remove from the fire and whisk until melted before adding the remaining chopped chocolate in two or three batches. A thick, 90°F bar of tempered chocolate will be produced.
Divide the chocolate between two sizable silicone hot chocolate bomb molds with a total of 6 cavities (2 1/2-inch cavities). To evenly cover the sides and the bottom, use a small brush to spread the chocolate up the sides. Make sure the sides are thick enough to reach the mold's edge. Allow it to rest for 20 to 30 minutes at room temperature until thoroughly set. (If the weather is too hot, you can put the molds in the refrigerator for a little while to complete.)
Remove the chocolate half-spheres from the molds with care while wearing latex gloves. Put it on the work surface on a piece of parchment paper. Six of the half-spheres should each have one-half of the hot cocoa, three or four pumpkin marshmallows, one ghost, one spider, and a half to one teaspoon of sprinkles.
Warm a small nonstick skillet over very low heat. To seal the bombs, set an unfilled half-sphere on the skillet open-side down for just a second to warm the chocolate. Set on top of a filled half-sphere, matching the seams as much as possible. Repeat with the remaining half-spheres. Let sit until hardened, about 5 minutes.
Put the regular marshmallows in a small, microwave-safe bowl to create the marshmallow webs. Microwave until the marshmallows inflate and soften, 10 to 15 seconds. With gloved hands, pull up a little bit of marshmallow and stretch between your fingers to make thin webbing. Stretch the webbing over and around the bombs. Continue to pull and stretch the marshmallow until all of the bombs are covered in webbing. Add 2 candy eyes or a spider to each, if desired.
To serve, heat 6 to 8 ounces of milk per bomb until very hot. Add to mugs and drop in the bombs. Enjoy, stirring to melt the chocolate.
Ingredients
Directions
Put 8 ounces of chocolate in a double boiler over low heat to temper it. Heat the chocolate while stirring until it almost melts (about 100 degrees F on an instant-read thermometer). Remove from the fire and whisk until melted before adding the remaining chopped chocolate in two or three batches. A thick, 90°F bar of tempered chocolate will be produced.
Divide the chocolate between two sizable silicone hot chocolate bomb molds with a total of 6 cavities (2 1/2-inch cavities). To evenly cover the sides and the bottom, use a small brush to spread the chocolate up the sides. Make sure the sides are thick enough to reach the mold's edge. Allow it to rest for 20 to 30 minutes at room temperature until thoroughly set. (If the weather is too hot, you can put the molds in the refrigerator for a little while to complete.)
Remove the chocolate half-spheres from the molds with care while wearing latex gloves. Put it on the work surface on a piece of parchment paper. Six of the half-spheres should each have one-half of the hot cocoa, three or four pumpkin marshmallows, one ghost, one spider, and a half to one teaspoon of sprinkles.
Warm a small nonstick skillet over very low heat. To seal the bombs, set an unfilled half-sphere on the skillet open-side down for just a second to warm the chocolate. Set on top of a filled half-sphere, matching the seams as much as possible. Repeat with the remaining half-spheres. Let sit until hardened, about 5 minutes.
Put the regular marshmallows in a small, microwave-safe bowl to create the marshmallow webs. Microwave until the marshmallows inflate and soften, 10 to 15 seconds. With gloved hands, pull up a little bit of marshmallow and stretch between your fingers to make thin webbing. Stretch the webbing over and around the bombs. Continue to pull and stretch the marshmallow until all of the bombs are covered in webbing. Add 2 candy eyes or a spider to each, if desired.
To serve, heat 6 to 8 ounces of milk per bomb until very hot. Add to mugs and drop in the bombs. Enjoy, stirring to melt the chocolate.
Notes
Monster Mashed Avocado

Mash avocado in a small bowl with lime juice. Season with salt.
Spread the mixture evenly over each rice cake.
To make the witches, place 3 or 4 matchsticks of carrot on either side of 8 rice cakes to form the hair.
Cut 8 small triangles from the nori sheet, using a rice cake as a size guide, then place triangles on top of each rice cake to make witch’s hats.
Place 2 sesame seeds below the hat to make the eyes.
Place one matchstick of carrot in the center of the avocado mixture, facing upwards to form the nose.
To make the one-eyed monsters, arrange 4 or 5 matchsticks of carrot on top of the remaining 8 rice cakes to form the hair.
Place 1 slice of string cheese in the center of each rice cake, then place 1 caper on top of each. Serve.
Ingredients
Directions
Mash avocado in a small bowl with lime juice. Season with salt.
Spread the mixture evenly over each rice cake.
To make the witches, place 3 or 4 matchsticks of carrot on either side of 8 rice cakes to form the hair.
Cut 8 small triangles from the nori sheet, using a rice cake as a size guide, then place triangles on top of each rice cake to make witch’s hats.
Place 2 sesame seeds below the hat to make the eyes.
Place one matchstick of carrot in the center of the avocado mixture, facing upwards to form the nose.
To make the one-eyed monsters, arrange 4 or 5 matchsticks of carrot on top of the remaining 8 rice cakes to form the hair.
Place 1 slice of string cheese in the center of each rice cake, then place 1 caper on top of each. Serve.
Notes
Mayver’s Apple Monsters
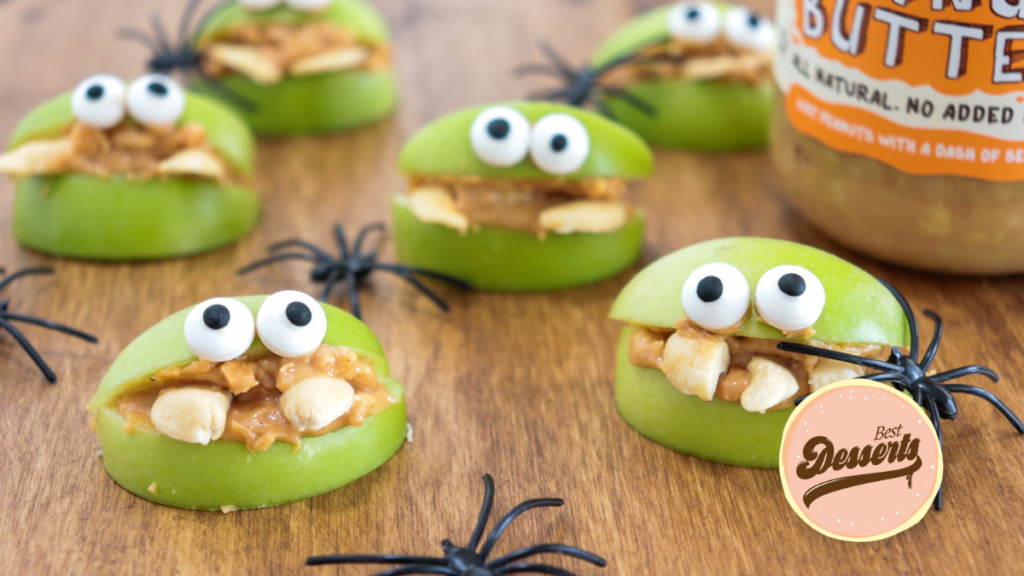
Slice apple into 12 wedges (6 pairs), and split cashew nuts in half, lengthways.
Spread Mayver’s peanut butter on bottom wedges of each pair and arrange split cashew nuts on top to look like fangs. Spread peanut butter on top wedge and place onto bottom wedge to look like a mouth.
Use a very small amount of peanut butter to stick candy eyes onto the top wedge.
Ingredients
Directions
Slice apple into 12 wedges (6 pairs), and split cashew nuts in half, lengthways.
Spread Mayver’s peanut butter on bottom wedges of each pair and arrange split cashew nuts on top to look like fangs. Spread peanut butter on top wedge and place onto bottom wedge to look like a mouth.
Use a very small amount of peanut butter to stick candy eyes onto the top wedge.
Notes
Peek a Boo Cupcakes
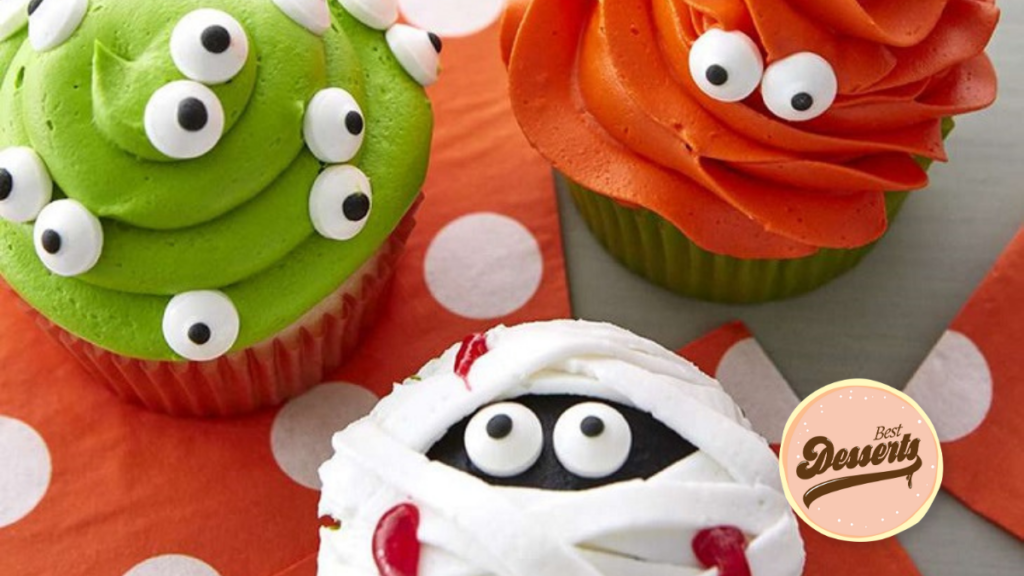
Bake cupcakes in orange and green baking cups. Cool well before decorating.
Tint icing. Combine Leaf Green and Lemon Yellow for green shown. Divide icing and tint icing: 1/2 cup black, 2 cups green, 2 cups orange, reserve 1 cup white.
Decorate cupcakes.
Mummy: Use spatula and black icing to cover top 1/4 of cupcake. Use white icing and tip 47 to pipe stripes for mummy wrapping. Add red gel to pipe drops of blood. Position candy eyeballs.
Pumpkin: Use orange icing and tip 1M to pipe swirls on top of cupcake. Use green icing and tip 352 to pipe leaf stem on top. Position candy eyeballs.
Monster: Use green icing and tip 2A to pipe swirls on top of cupcake. Position candy eyeballs.
Ingredients
Directions
Bake cupcakes in orange and green baking cups. Cool well before decorating.
Tint icing. Combine Leaf Green and Lemon Yellow for green shown. Divide icing and tint icing: 1/2 cup black, 2 cups green, 2 cups orange, reserve 1 cup white.
Decorate cupcakes.
Mummy: Use spatula and black icing to cover top 1/4 of cupcake. Use white icing and tip 47 to pipe stripes for mummy wrapping. Add red gel to pipe drops of blood. Position candy eyeballs.
Pumpkin: Use orange icing and tip 1M to pipe swirls on top of cupcake. Use green icing and tip 352 to pipe leaf stem on top. Position candy eyeballs.
Monster: Use green icing and tip 2A to pipe swirls on top of cupcake. Position candy eyeballs.
Notes
Batty Bliss Balls
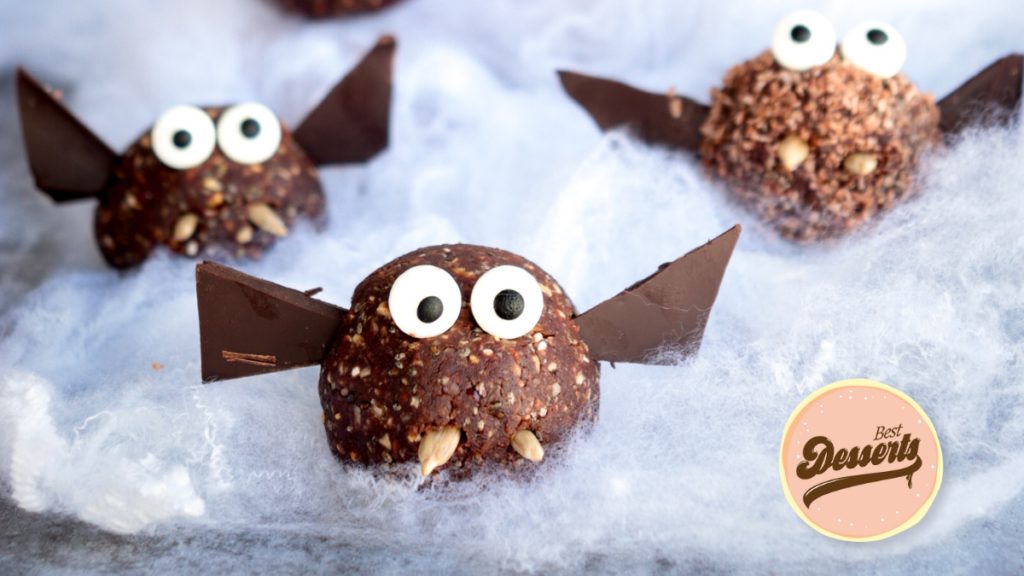
Combine all ingredients, except water, in a food processor and process until smooth.
Slowly add small amounts of water to the mixture, processing after each addition, until the mixture holds together when shaped into a ball (you may not need to use all the water).
Roll teaspoon amounts of mixture into balls. Combine desiccated coconut and extra cacao on small plate and roll half of the balls in this.
Use a sharp knife to cut chocolate into wing-like shards and insert into balls to create bat wings.
Decorate with candy eyes and sunflower seeds as fangs. Store in container in fridge.
Ingredients
Directions
Combine all ingredients, except water, in a food processor and process until smooth.
Slowly add small amounts of water to the mixture, processing after each addition, until the mixture holds together when shaped into a ball (you may not need to use all the water).
Roll teaspoon amounts of mixture into balls. Combine desiccated coconut and extra cacao on small plate and roll half of the balls in this.
Use a sharp knife to cut chocolate into wing-like shards and insert into balls to create bat wings.
Decorate with candy eyes and sunflower seeds as fangs. Store in container in fridge.
Notes
Gingerbread Smoothie
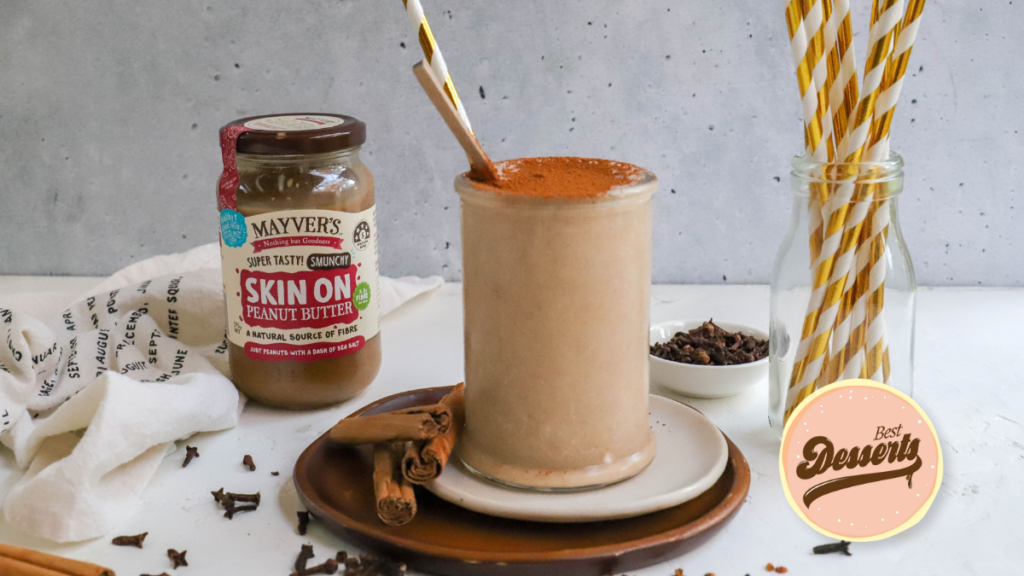
Put all ingredients into the blender and blend until smooth.
Pour into a tall glass and dust with cinnamon for serving.
Enjoy!
Ingredients
Directions
Put all ingredients into the blender and blend until smooth.
Pour into a tall glass and dust with cinnamon for serving.
Enjoy!
Notes
Peanut Butter Eyeballs
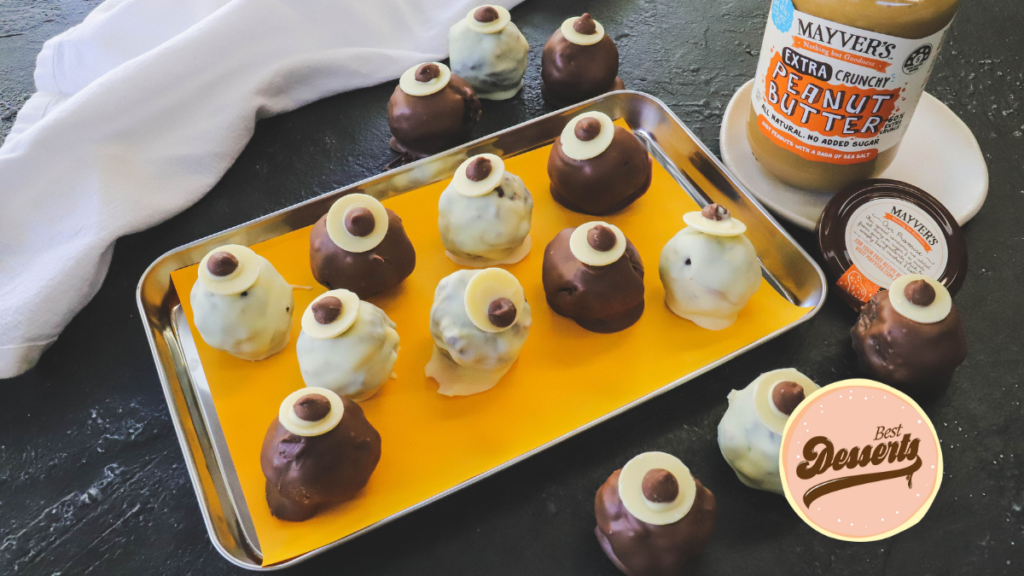
Combine oats, honey and peanut butter and roll into balls. Refrigerate until firm.
Dip each ball into melted dark or white chocolate.
Top with one white chocolate disc button and chocolate drop to complete eyeballs.
Ingredients
Directions
Combine oats, honey and peanut butter and roll into balls. Refrigerate until firm.
Dip each ball into melted dark or white chocolate.
Top with one white chocolate disc button and chocolate drop to complete eyeballs.
Notes
Choc Chip PB Muffin Ghosts
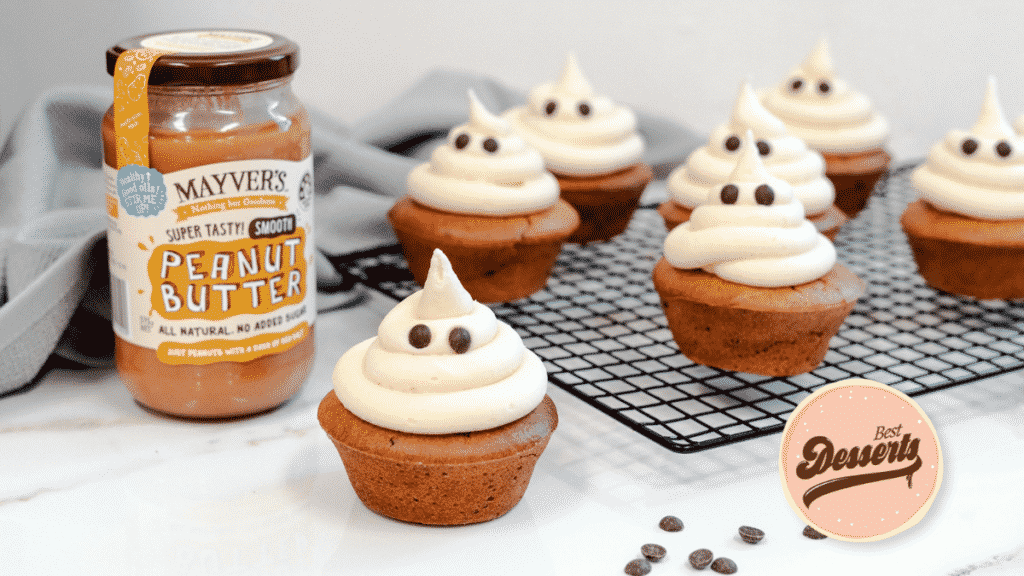
Preheat the oven to 180 °C, on a fan forced setting.
Grease 10 holes of a muffin tray and set aside.
Combine the flour, coconut sugar, baking powder and cinnamon in a bowl.
Next, add the peanut butter, eggs, melted butter and coconut milk to the bowl and stir well to combine.
Stir through the chocolate chips and divide the muffin mixture amongst the muffin tray.
Place the muffins in the oven to cook for 25 minutes, until a toothpick comes out dry.
After this time, remove the muffins from the oven and allow to sit for 5 minutes.
Transfer the muffins to a cooling rack.
Remove the coconut cream from the fridge. Do not shake or mix the can.
Scoop out all of the solid coconut cream and place it in a bowl. Avoid the liquid, leaving that in the can.
Add the stevia and vanilla to the bowl and use a hand mixer to whip the cream, until creamy and smooth.
Place the coconut cream icing in a piping bag with a round attachment. Pipe the mixture onto each muffin.
Once the muffins have been iced, make the eyes by adding 2 mini chocolate chips to each.
Ingredients
Directions
Preheat the oven to 180 °C, on a fan forced setting.
Grease 10 holes of a muffin tray and set aside.
Combine the flour, coconut sugar, baking powder and cinnamon in a bowl.
Next, add the peanut butter, eggs, melted butter and coconut milk to the bowl and stir well to combine.
Stir through the chocolate chips and divide the muffin mixture amongst the muffin tray.
Place the muffins in the oven to cook for 25 minutes, until a toothpick comes out dry.
After this time, remove the muffins from the oven and allow to sit for 5 minutes.
Transfer the muffins to a cooling rack.
Remove the coconut cream from the fridge. Do not shake or mix the can.
Scoop out all of the solid coconut cream and place it in a bowl. Avoid the liquid, leaving that in the can.
Add the stevia and vanilla to the bowl and use a hand mixer to whip the cream, until creamy and smooth.
Place the coconut cream icing in a piping bag with a round attachment. Pipe the mixture onto each muffin.
Once the muffins have been iced, make the eyes by adding 2 mini chocolate chips to each.
Notes
Halloween Pumpkin Cupcakes
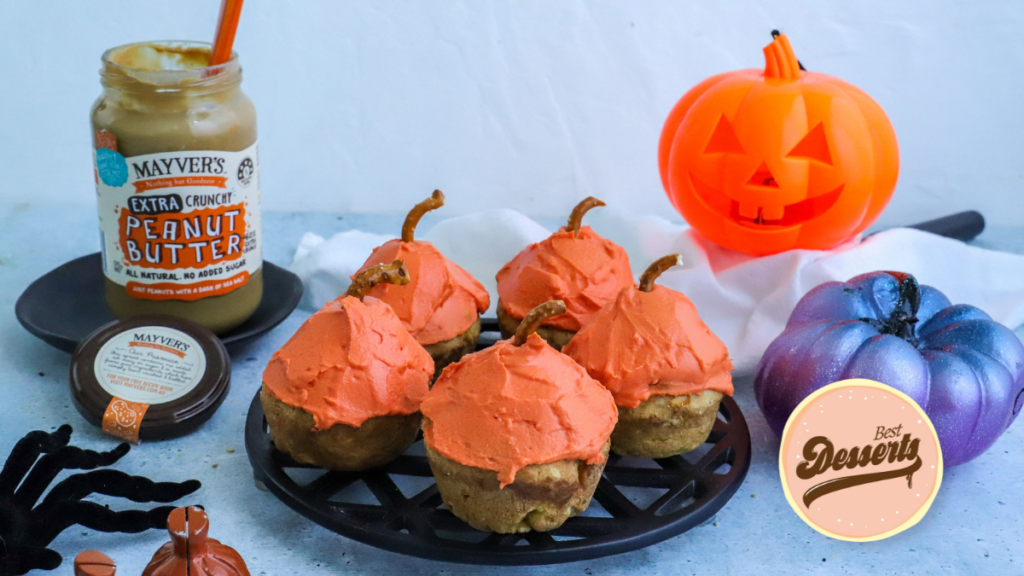
Preheat the oven to 170 degrees C. Grease a 24 mini muffin tray with butter.
In a medium bowl, beat together the Mayver’s Extra Crunchy Peanut Butter and maple syrup with a whisk, then beat in the eggs. Mix in the pumpkin puree, milk, baking soda, vanilla extract, cinnamon, ginger, nutmeg, allspice and a pinch of salt.
Add the flour and stir through until just mixed, don’t over mix.
Distribute the mixture between 24 mini muffin holes. Bake for 20-25 minutes or until the top is golden and when a bamboo skewer inserted into a cupcake comes out clean.
Remove the cupcakes to a wire rack and cool completely.
To make the icing, beat together creamed cheese, butter. Add a few drops of food colour and mix, continue to add drops of colour and mixing until you have a pumpkin orange colour.
Smear a heaped tablespoon of icing onto cooled cupcake with a butter knife and smooth out.
Use the back edge of the knife to create 6 grooves from the middle of the cupcake to make the pumpkin look. Stick a pretzel twig into the middle of each cupcake to make the stalk of the pumpkin.
Ingredients
Directions
Preheat the oven to 170 degrees C. Grease a 24 mini muffin tray with butter.
In a medium bowl, beat together the Mayver’s Extra Crunchy Peanut Butter and maple syrup with a whisk, then beat in the eggs. Mix in the pumpkin puree, milk, baking soda, vanilla extract, cinnamon, ginger, nutmeg, allspice and a pinch of salt.
Add the flour and stir through until just mixed, don’t over mix.
Distribute the mixture between 24 mini muffin holes. Bake for 20-25 minutes or until the top is golden and when a bamboo skewer inserted into a cupcake comes out clean.
Remove the cupcakes to a wire rack and cool completely.
To make the icing, beat together creamed cheese, butter. Add a few drops of food colour and mix, continue to add drops of colour and mixing until you have a pumpkin orange colour.
Smear a heaped tablespoon of icing onto cooled cupcake with a butter knife and smooth out.
Use the back edge of the knife to create 6 grooves from the middle of the cupcake to make the pumpkin look. Stick a pretzel twig into the middle of each cupcake to make the stalk of the pumpkin.
Notes
Ghost Cookies
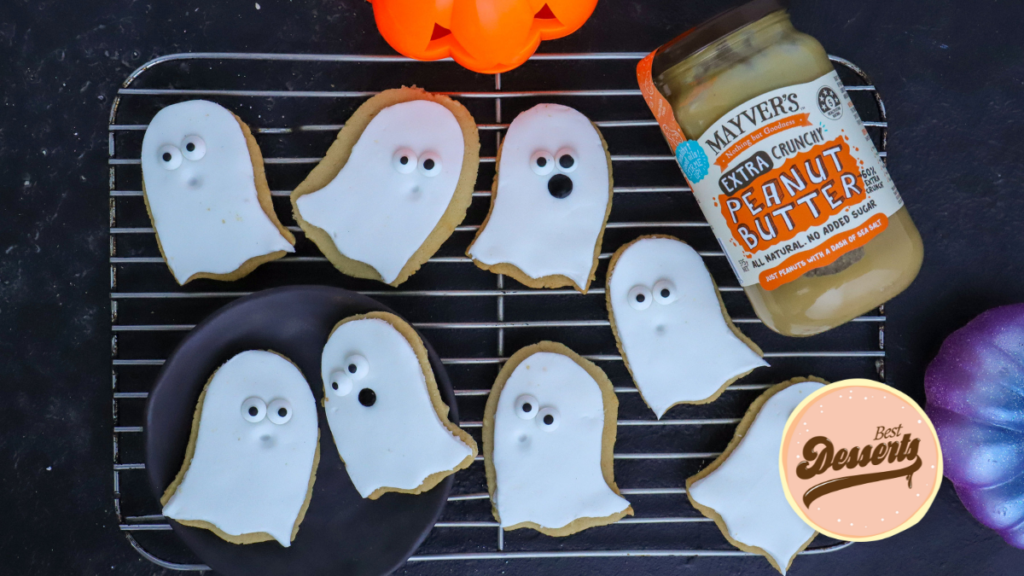
Place butter and Mayver’s Extra Crunchy Peanut Butter in a medium mixing bowl. Mix well with an electric beater until light and fluffy. Add both sugars, egg and vanilla and pulse until well combined.
Stir in baking powder and flour. Place in the fridge for 1 hour to rest.
Preheat the oven to 180C/160C (fan forced) and line three baking trays with baking paper.
Use a lightly floured rolling pin to roll out dough on a large sheet of baking paper until 4-5mm thick. Cut out ghosts with your desired cutter and place onto lined baking trays. Repeat with remaining mixture.
Bake for 10 minutes or until golden. Transfer to a cooling rack to cool.
Decorate with icing and candy eyes.
Ingredients
Directions
Place butter and Mayver’s Extra Crunchy Peanut Butter in a medium mixing bowl. Mix well with an electric beater until light and fluffy. Add both sugars, egg and vanilla and pulse until well combined.
Stir in baking powder and flour. Place in the fridge for 1 hour to rest.
Preheat the oven to 180C/160C (fan forced) and line three baking trays with baking paper.
Use a lightly floured rolling pin to roll out dough on a large sheet of baking paper until 4-5mm thick. Cut out ghosts with your desired cutter and place onto lined baking trays. Repeat with remaining mixture.
Bake for 10 minutes or until golden. Transfer to a cooling rack to cool.
Decorate with icing and candy eyes.
Notes
Poisoned Halloween Black Apple

Wash and dry the apple, insert a lollipop stick or a thicken wooden skewer into the middle of each apple.
In a medium size heavy saucepan combine the sugar and water, bring the mixture to boil, to prevent burning on the side of the pan, use a wet pastry brush to wipe the sugar granules that collect above the boiling mixture. After the mixture is boiling well let it simmer for about 20 min until reach the hard crack stage ( 145 to 155 degrees), it is best aften check with a candy thermometer. Then add the cream of tartar and the food colouring and stir well, remove the pan from the heat and wait until the syrup stops bubbling.
To dip the apples, carefully tip the pan to one side, insert an apple into the mixture then rotate until it is all covered. Allow it to drain a little then move the apple on a baking paper to cool and harden, then spray some edible gold powder to give them an extra texture to the caramel.
If no candy thermometer is available, it is possible to deep a piece of syrup into a glass of cold water, if it becomes instantly hard and cracks means it is ready
The induction cooktop gives a very good temperature control, which is essential for recipes like this one.
Ingredients
Directions
Wash and dry the apple, insert a lollipop stick or a thicken wooden skewer into the middle of each apple.
In a medium size heavy saucepan combine the sugar and water, bring the mixture to boil, to prevent burning on the side of the pan, use a wet pastry brush to wipe the sugar granules that collect above the boiling mixture. After the mixture is boiling well let it simmer for about 20 min until reach the hard crack stage ( 145 to 155 degrees), it is best aften check with a candy thermometer. Then add the cream of tartar and the food colouring and stir well, remove the pan from the heat and wait until the syrup stops bubbling.
To dip the apples, carefully tip the pan to one side, insert an apple into the mixture then rotate until it is all covered. Allow it to drain a little then move the apple on a baking paper to cool and harden, then spray some edible gold powder to give them an extra texture to the caramel.
If no candy thermometer is available, it is possible to deep a piece of syrup into a glass of cold water, if it becomes instantly hard and cracks means it is ready
The induction cooktop gives a very good temperature control, which is essential for recipes like this one.
Notes
Halloween Spooky Slice
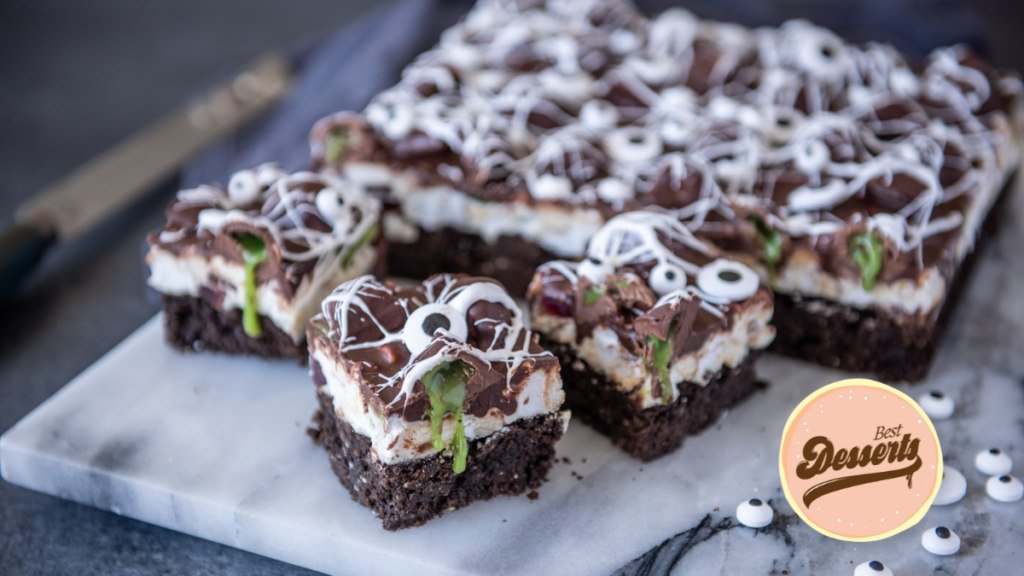
Preheat oven to 170°C (fan forced). Line a Wiltshire Easybake square brownie pan with baking paper, ensuring the baking paper rises at least 2cm above the pan (these will be used as handles to pull the slice out of the pan once set).
To make the brownie layer, combine chocolate and butter in a small saucepan and heat over medium low heat, stirring, until melted and smooth. Remove from heat and stir in sugar. Set aside to cool for 2 minutes, then add the eggs and whisk well. Stir in the flour and coconut, then spread into the base of your lined pan and bake for 35-45 minutes. Set aside to cool.
To make the rocky road layer, combine the marshmallows, biscuits, snakes and coconut in a large bowl. Place the white chocolate in a microwave safe bowl and microwave in short bursts on half power, stirring between each burst, until completely melted. Combine the melted white chocolate with the other ingredients and stir well until completely combined. Pour into the brownie pan, on top of the brownie layer and level with an offset spatula. Using a sheet of baking paper, press down on the top of the rocky road layer to ensure it is compact and level. Top evenly with the Cadbury peppermint chocolate squares and set aside in the fridge to set.
Once set, melt the milk chocolate in the microwave using the same method as the white chocolate. Working quickly, spoon a teaspoon full of chocolate over each peppermint chocolate square, then pour the remaining chocolate on top of the slice and tilt the pan to move the chocolate around and ensure the top of the rocky road is covered. Set aside in the fridge to set completely, preferably overnight.
To decorate the top of your slice, remove the slice from the pan and place it on a board. Microwave the marshmallows for 20 seconds until melted, then stir with a spoon to combine. Leave for 30 - 45 seconds. Using just your fingertips, dip both hands in the melted marshmallow then press the fingertips of your hands together and pull them apart to form “cobwebs”. Lay the cobwebs over your slice then repeat with more cobwebs until you are happy with coverage. If marshmallow cobwebs do not form, then the mixture may either be too hot or too cold. Either leave it to sit a little longer or reheat the mixture in the microwave for a few seconds. Top with candy eyeballs and serve!
Ingredients
Directions
Preheat oven to 170°C (fan forced). Line a Wiltshire Easybake square brownie pan with baking paper, ensuring the baking paper rises at least 2cm above the pan (these will be used as handles to pull the slice out of the pan once set).
To make the brownie layer, combine chocolate and butter in a small saucepan and heat over medium low heat, stirring, until melted and smooth. Remove from heat and stir in sugar. Set aside to cool for 2 minutes, then add the eggs and whisk well. Stir in the flour and coconut, then spread into the base of your lined pan and bake for 35-45 minutes. Set aside to cool.
To make the rocky road layer, combine the marshmallows, biscuits, snakes and coconut in a large bowl. Place the white chocolate in a microwave safe bowl and microwave in short bursts on half power, stirring between each burst, until completely melted. Combine the melted white chocolate with the other ingredients and stir well until completely combined. Pour into the brownie pan, on top of the brownie layer and level with an offset spatula. Using a sheet of baking paper, press down on the top of the rocky road layer to ensure it is compact and level. Top evenly with the Cadbury peppermint chocolate squares and set aside in the fridge to set.
Once set, melt the milk chocolate in the microwave using the same method as the white chocolate. Working quickly, spoon a teaspoon full of chocolate over each peppermint chocolate square, then pour the remaining chocolate on top of the slice and tilt the pan to move the chocolate around and ensure the top of the rocky road is covered. Set aside in the fridge to set completely, preferably overnight.
To decorate the top of your slice, remove the slice from the pan and place it on a board. Microwave the marshmallows for 20 seconds until melted, then stir with a spoon to combine. Leave for 30 - 45 seconds. Using just your fingertips, dip both hands in the melted marshmallow then press the fingertips of your hands together and pull them apart to form “cobwebs”. Lay the cobwebs over your slice then repeat with more cobwebs until you are happy with coverage. If marshmallow cobwebs do not form, then the mixture may either be too hot or too cold. Either leave it to sit a little longer or reheat the mixture in the microwave for a few seconds. Top with candy eyeballs and serve!
Notes
Gluten-Free Halloween Cupcakes

Preheat oven to 160C (fan forced) or 180C (conventional).
Spray tray with cooking oil or place cupcake cases.
Add eggs (or vegan egg replacer), softened margarine, water, and vanilla cupcake mix.
Mix using electric mixer for 2 minutes.
Pour batter evenly into tray and bake for 20-25 minutes. Cupcakes are baked if they bounce back when pressed at the peak.
Remove cupcakes from oven and let cool.
Cream the margarine in slow speed using electric mixer and gradually add the frosting mix. Add food colour until desired colour is achieved.
Print template and tape on to your working surface.
Place plastic or non-stick sheets on top of the template and tape down.
Put chocolate melts in the microwave in 20-second intervals until melted.
Let cool for a bit and pour into piping bag with very small opening.
Trace the template you printed.
Place in fridge until it's set.
Ingredients
Directions
Preheat oven to 160C (fan forced) or 180C (conventional).
Spray tray with cooking oil or place cupcake cases.
Add eggs (or vegan egg replacer), softened margarine, water, and vanilla cupcake mix.
Mix using electric mixer for 2 minutes.
Pour batter evenly into tray and bake for 20-25 minutes. Cupcakes are baked if they bounce back when pressed at the peak.
Remove cupcakes from oven and let cool.
Cream the margarine in slow speed using electric mixer and gradually add the frosting mix. Add food colour until desired colour is achieved.
Print template and tape on to your working surface.
Place plastic or non-stick sheets on top of the template and tape down.
Put chocolate melts in the microwave in 20-second intervals until melted.
Let cool for a bit and pour into piping bag with very small opening.
Trace the template you printed.
Place in fridge until it's set.
Notes
Roasted Pear Spooky Mummies
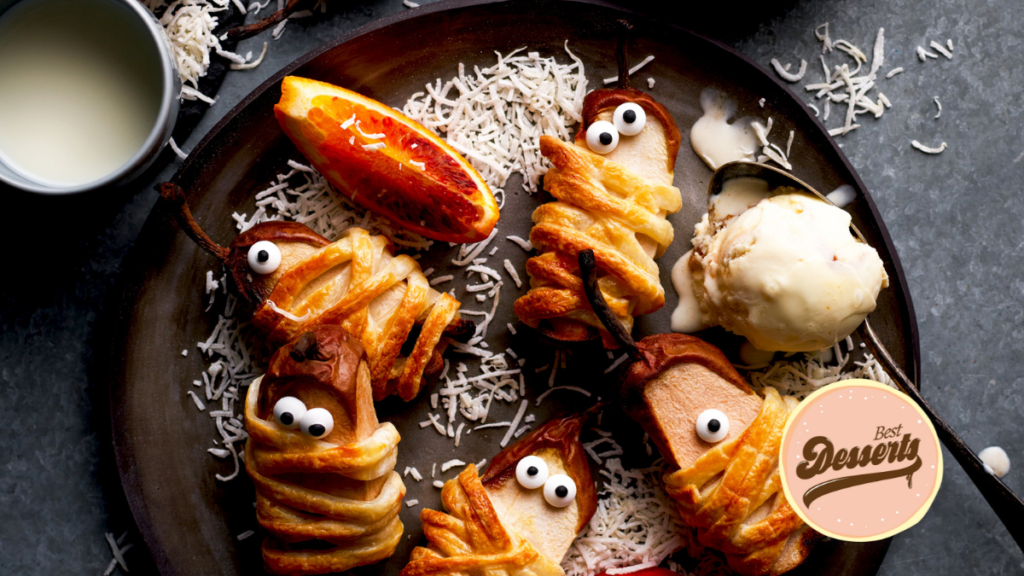
Roasted Pear Spooky Mummies
Preheat oven to 200°C. Use a melon ball to remove the pear cores from the base, then use a small knife to slice off the cheeks of the pears. Reserve the pear trimmings for another use.
Slice the pastry into fine strips, then wrap around the pears in overlapping layers to make bandages. Brush with the egg, arrange on lined oven trays, then bake for 18 minutes, until golden and crisp. Decorate with candy eyes.
Ingredients
Directions
Preheat oven to 200°C. Use a melon ball to remove the pear cores from the base, then use a small knife to slice off the cheeks of the pears. Reserve the pear trimmings for another use.
Slice the pastry into fine strips, then wrap around the pears in overlapping layers to make bandages. Brush with the egg, arrange on lined oven trays, then bake for 18 minutes, until golden and crisp. Decorate with candy eyes.
Notes
Mummy Pops
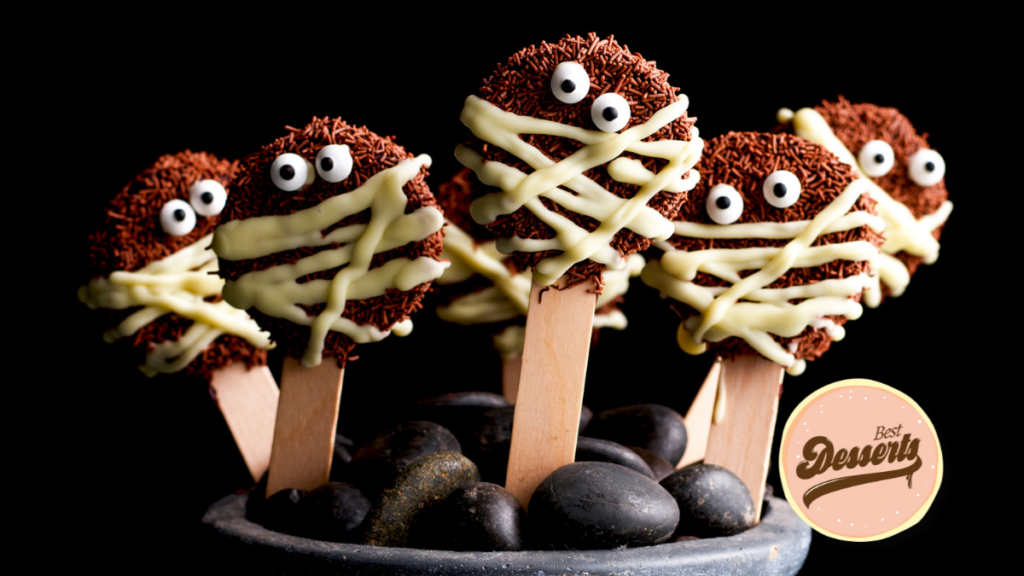
Mummy Pops
Cut the cake into 4 slices, then make two 6cm discs out of each with a biscuit cutter, then insert a paddle pop stick into each. Freeze until firm.
Melt the dark chocolate and coat the cakes, then finish with sprinkles. Melt the white chocolate and load into a piping bag with a fine tip and pipe on to make mummy bandages. Stick candy eyes on with the remaining white chocolate.
Ingredients
Directions
Cut the cake into 4 slices, then make two 6cm discs out of each with a biscuit cutter, then insert a paddle pop stick into each. Freeze until firm.
Melt the dark chocolate and coat the cakes, then finish with sprinkles. Melt the white chocolate and load into a piping bag with a fine tip and pipe on to make mummy bandages. Stick candy eyes on with the remaining white chocolate.
Notes
Ed Halmagyi’s Monster Apples
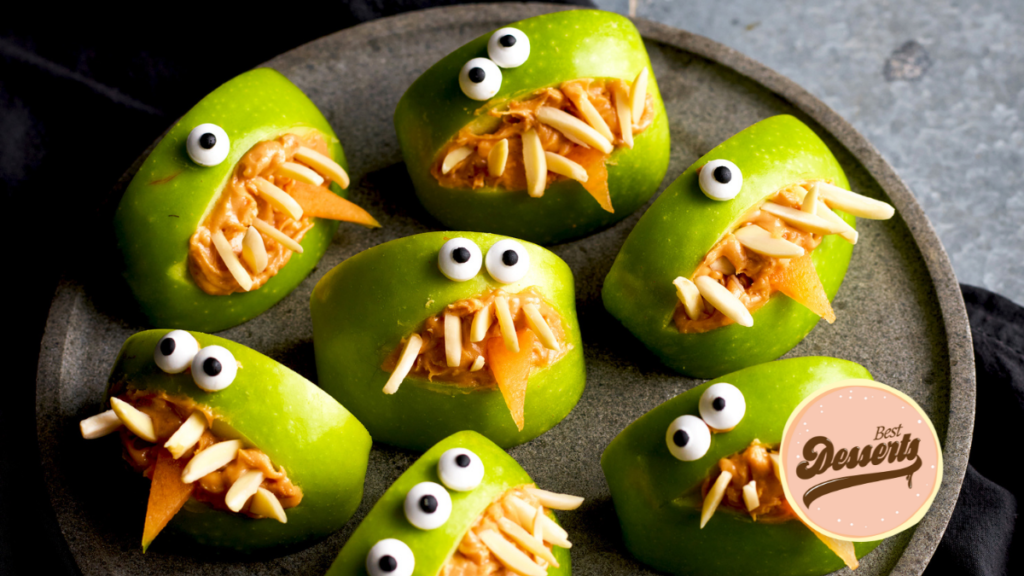
Funny Monster Apples
Cut the apples into quarters, then cut a wedge out of the middle of each with a small knife. Fill with peanut butter.
Insert flaked almonds into the top and bottom of the open wedge to make teeth. Cut the rockmelon into small thin triangles and place in the mouths as tongues. Stick on candy eyes with a small amount of peanut butter.
Ingredients
Directions
Cut the apples into quarters, then cut a wedge out of the middle of each with a small knife. Fill with peanut butter.
Insert flaked almonds into the top and bottom of the open wedge to make teeth. Cut the rockmelon into small thin triangles and place in the mouths as tongues. Stick on candy eyes with a small amount of peanut butter.
Notes
Spider Bites
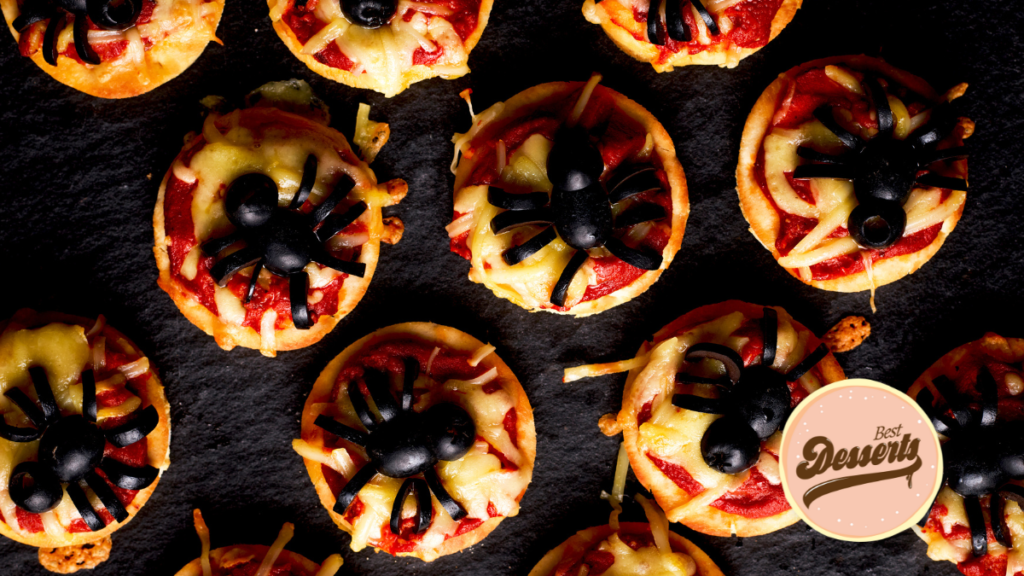
Spider Bites
Preheat oven to 180°C. Use a 6cm round cutter to make 12 discs from the pizza base. Arrange on a lined oven tray then top with sauce and cheese. Bake for 12 minutes, until the cheese is just golden.
Halve 18 olives lengthways and 6 olives across the middle. Use a long olive half for the spider bodies and an end piece for the head of each. Slice the remaining halved into four pieces each and arrange on the pizzas to make the spider legs.
Ingredients
Directions
Preheat oven to 180°C. Use a 6cm round cutter to make 12 discs from the pizza base. Arrange on a lined oven tray then top with sauce and cheese. Bake for 12 minutes, until the cheese is just golden.
Halve 18 olives lengthways and 6 olives across the middle. Use a long olive half for the spider bodies and an end piece for the head of each. Slice the remaining halved into four pieces each and arrange on the pizzas to make the spider legs.
Notes
Jack-O-Lantern Devilled Eggs
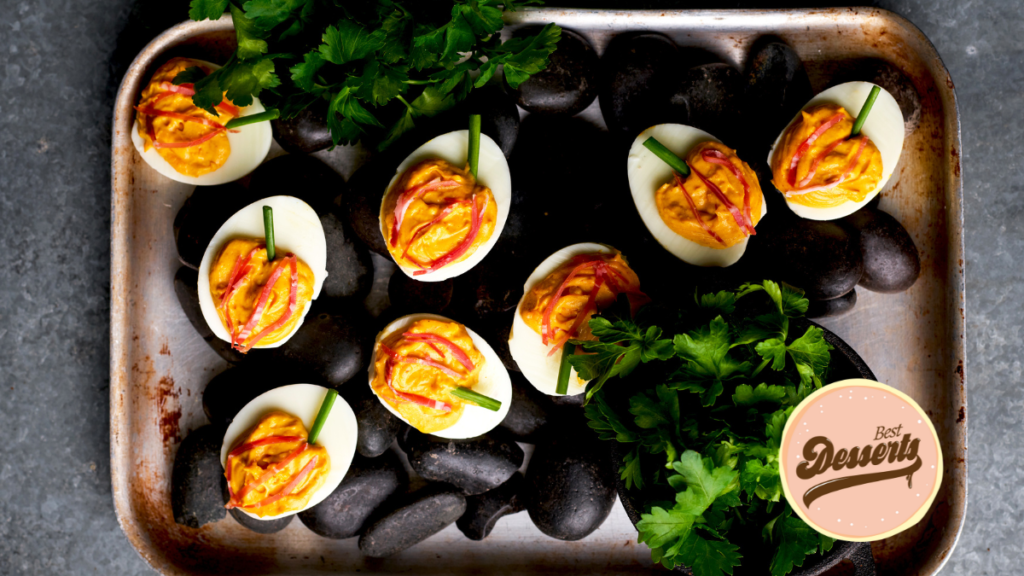
Jack-o-lantern Devilled Eggs
Place the eggs in a saucepan of cold water and set over a moderate heat. Bring to a simmer then cook for 8 minutes. Immerse in iced water until completely cold. Peel, then halve with a wet knife.
Gently scoop out the yolks and mash in a bowl with a fork. Mix in the mayonnaise and spices. Season with salt and pepper. Pipe back into the eggs. Decorate with prosciutto lines and a chive stem.
Ingredients
Directions
Place the eggs in a saucepan of cold water and set over a moderate heat. Bring to a simmer then cook for 8 minutes. Immerse in iced water until completely cold. Peel, then halve with a wet knife.
Gently scoop out the yolks and mash in a bowl with a fork. Mix in the mayonnaise and spices. Season with salt and pepper. Pipe back into the eggs. Decorate with prosciutto lines and a chive stem.
Notes
Bat Crackers with Roasted Beetroot and Apple Dip

Bat Crackers with Roasted Beetroot and Apple Dip
Preheat oven to 160°C. Use a bat-shaped cutter on the tortillas, then arrange the shapes on a lined oven tray. Mix the oil, seasoning and salt, brush onto the bats, then bake for 15-18 minutes, until crisp. Cool on a wire rack.
Grate the apple coarsely and squeeze out the excess liquid. Put in a food processor with the beetroot, garlic and aioli and puree until smooth. Serve with the crackers.
Ingredients
Directions
Preheat oven to 160°C. Use a bat-shaped cutter on the tortillas, then arrange the shapes on a lined oven tray. Mix the oil, seasoning and salt, brush onto the bats, then bake for 15-18 minutes, until crisp. Cool on a wire rack.
Grate the apple coarsely and squeeze out the excess liquid. Put in a food processor with the beetroot, garlic and aioli and puree until smooth. Serve with the crackers.
Notes
Frankenstein Rice Crispy Bars
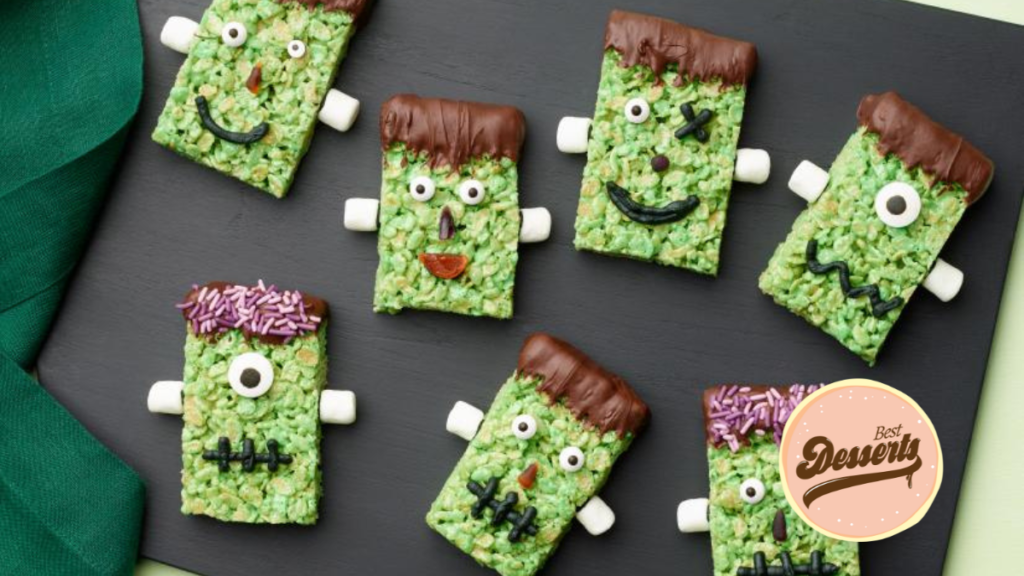
Nonstick spray a 9 by 13-inch baking dish.
In a Dutch oven or sizable saucepan, melt the butter over low heat. Add the marshmallows and food coloring and cook, stirring, until the marshmallows are completely melted, about 3 minutes. Turn off the heat and fold in the rice cereal. Place on the prepared baking dish. Apply nonstick spray to your palms and pat the mixture into an even layer. Refrigerate for about an hour, or until firm.
To release the treats, flip the baking dish onto a chopping board and give it a light tap. Trim the sides, then divide the rectangle in half to get two long rectangles. Make 5 equal, 2-inch broad pieces out of each rectangle. Line a rimmed baking sheet with wax paper.
Put the chocolate chips in a microwave-safe bowl. Microwave for one minute, stirring halfway through, until the food is just melted. Use a toothpick to move the chocolate around to form unique hair patterns. Put a dot of icing on the back of the candy decorations to stick on facial features. Use another dot of icing to stick a mini marshmallow on the sides of each head for neck bolts. Draw on additional features with the icing. Store in a cold, dry area or serve right away.
Ingredients
Directions
Nonstick spray a 9 by 13-inch baking dish.
In a Dutch oven or sizable saucepan, melt the butter over low heat. Add the marshmallows and food coloring and cook, stirring, until the marshmallows are completely melted, about 3 minutes. Turn off the heat and fold in the rice cereal. Place on the prepared baking dish. Apply nonstick spray to your palms and pat the mixture into an even layer. Refrigerate for about an hour, or until firm.
To release the treats, flip the baking dish onto a chopping board and give it a light tap. Trim the sides, then divide the rectangle in half to get two long rectangles. Make 5 equal, 2-inch broad pieces out of each rectangle. Line a rimmed baking sheet with wax paper.
Put the chocolate chips in a microwave-safe bowl. Microwave for one minute, stirring halfway through, until the food is just melted. Use a toothpick to move the chocolate around to form unique hair patterns. Put a dot of icing on the back of the candy decorations to stick on facial features. Use another dot of icing to stick a mini marshmallow on the sides of each head for neck bolts. Draw on additional features with the icing. Store in a cold, dry area or serve right away.
Notes
Strawberry Brain Cheesecake
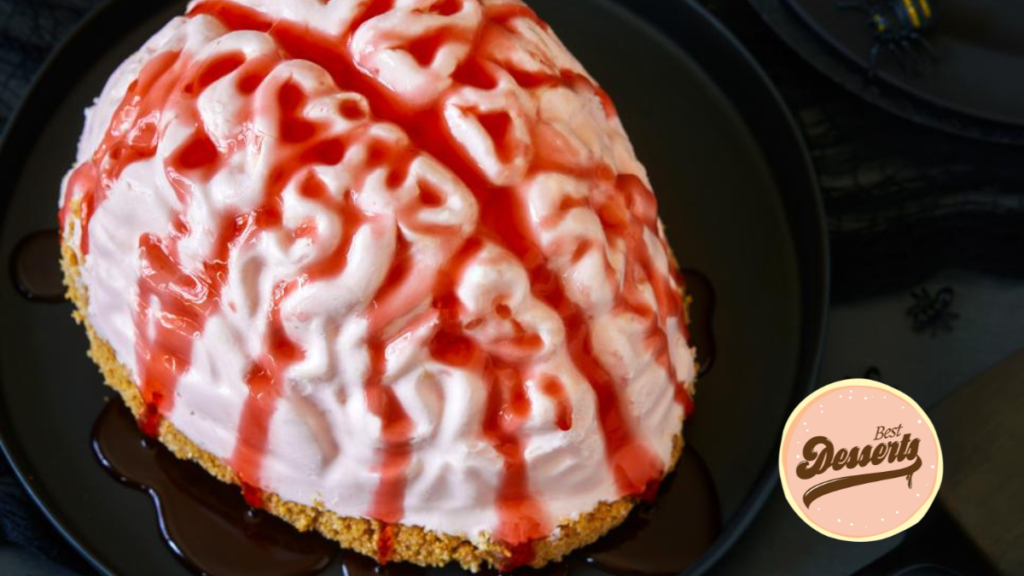
For the graham cracker crust: Pulse the graham crackers, brown sugar, cinnamon, and salt in a food processor until crumbs form. Drizzle in the butter and pulse until the mixture looks like wet sand. Move to a bowl, then clean the food processor.
Whisk the gelatin into 1/3 cup warm water and let sit until softened, about 5 minutes.
In the food processor, pulse the cream cheese until it is completely smooth, scraping the sides as necessary. Then include the softened gelatin, granulated sugar, salt, vanilla, and lemon juice. Pulse until completely smooth. With the food processor running, add the heavy cream and enough food coloring to make the batter light pink. Blend until well combined.
In a medium saucepan over medium-high heat, combine the strawberries, granulated sugar, lemon juice, and 1/4 cup water. Bring to a simmer and simmer until the berries are very soft but still maintain their shape. Strain the syrup, transfer the berries to a small bowl, and chill. Return the syrup to the saucepan and continue cooking until thickened, about 10 minutes. Chill the syrup until ready to use.
Coat a plastic 9.75-by-8.5-by-4-inch (7-cup) brain-shaped gelatin mold generously with nonstick cooking spray. Pour half of the cheesecake batter into the mold and swirl it around to coat the entire surface. Freeze for 5 minutes to let the batter thicken. Spread the batter up the sides of the mold to create a 1/2-inch-thick covering using the back of a spoon. To set the batter, freeze it for ten minutes.
Add the strawberries to the center of the mold. Over the strawberries, drizzle 1 tablespoon of the strawberry syrup. Evenly spread the remaining batter over the berries, pressing it into the mold to fill any voids. Top with the graham cracker crumbs, pressing to create a firm crust. Place the cheesecake in the freezer for about two hours, or until the sides are very stiff and nearly frozen. Before serving, transfer to the refrigerator and chill for two hours.
To remove the cheesecake from the mold, carefully place the mold briefly into a bowl of hot water, then run a small offset spatula around the edge of the mold to help release the cheesecake from the sides. Invert onto a plate and poke small holes in the mold with a paring knife to help release the cheesecake from the mold. Pull the mold carefully. Add the remaining strawberry syrup on top of the brain.
Ingredients
Directions
For the graham cracker crust: Pulse the graham crackers, brown sugar, cinnamon, and salt in a food processor until crumbs form. Drizzle in the butter and pulse until the mixture looks like wet sand. Move to a bowl, then clean the food processor.
Whisk the gelatin into 1/3 cup warm water and let sit until softened, about 5 minutes.
In the food processor, pulse the cream cheese until it is completely smooth, scraping the sides as necessary. Then include the softened gelatin, granulated sugar, salt, vanilla, and lemon juice. Pulse until completely smooth. With the food processor running, add the heavy cream and enough food coloring to make the batter light pink. Blend until well combined.
In a medium saucepan over medium-high heat, combine the strawberries, granulated sugar, lemon juice, and 1/4 cup water. Bring to a simmer and simmer until the berries are very soft but still maintain their shape. Strain the syrup, transfer the berries to a small bowl, and chill. Return the syrup to the saucepan and continue cooking until thickened, about 10 minutes. Chill the syrup until ready to use.
Coat a plastic 9.75-by-8.5-by-4-inch (7-cup) brain-shaped gelatin mold generously with nonstick cooking spray. Pour half of the cheesecake batter into the mold and swirl it around to coat the entire surface. Freeze for 5 minutes to let the batter thicken. Spread the batter up the sides of the mold to create a 1/2-inch-thick covering using the back of a spoon. To set the batter, freeze it for ten minutes.
Add the strawberries to the center of the mold. Over the strawberries, drizzle 1 tablespoon of the strawberry syrup. Evenly spread the remaining batter over the berries, pressing it into the mold to fill any voids. Top with the graham cracker crumbs, pressing to create a firm crust. Place the cheesecake in the freezer for about two hours, or until the sides are very stiff and nearly frozen. Before serving, transfer to the refrigerator and chill for two hours.
To remove the cheesecake from the mold, carefully place the mold briefly into a bowl of hot water, then run a small offset spatula around the edge of the mold to help release the cheesecake from the sides. Invert onto a plate and poke small holes in the mold with a paring knife to help release the cheesecake from the mold. Pull the mold carefully. Add the remaining strawberry syrup on top of the brain.
Notes

Leave a Reply